2
$\begingroup$

I just started resin printing in order to build enclosures for my little microcontroller projects. Sadly, I am having trouble getting good, planar, rectangular objects to print.

Background: I have no prior experience with filament or resin printing. I chose resin over filament for its higher precision, which I will need in future projects. I bought a well-recommended, popular 4K monochrome LCD printer. I was unwise in selecting a translucent resin for my learning-curve projects, but the first project required color. (Note to self: try paint.)

My first three prints were throw-aways as I learned the essentials. The first print was pretty encouraging, but I used no supports (the first 'essential') and it split during removal from the adhesion plate. The next two suffered drop-outs due to underexposure; a careful cleaning of the FEP was done after each to remove the pancaked material left behind.

Print 004 was promising, but had a rounded (drooping) corner and signs of pooling on the top of the rectangle. For print 005 I added more supports to that corner, thinned the rest out to increase drainage, and reduced exposure in hopes that this would avoid 'freezing' resin on the upper surface.

I seek advice on this pooling problem. Photo below. Print 005 shows 'waves', much like windswept water, 'above' each support point. The interior surfaces which were "face down" during printing are all pleasingly smooth and planar.

Elbow grease and 220-320-400 sandpaper can produce a more finished look; print 004 has been sanded and is on the left edge of the photo. But I really should only need to do a very light sanding, and then only to buff out tiny remnants of the supports, correct?

These objects were printed with 5mm lift and ~35 deg. tilt on both X and Y, lower-right corner first, upper-left last.

After reviewing my post, I suspect I need a lower exposure time.. but.. those drop-outs..

Thanks for your time, Regards.

PS: I neglected to mention that I do wash the prints before sun-curing them. I remove them from the build plate (with due caution), immerse them in about 2cm of IPA, agitate for 15-30 seconds, remove and rinse with non-chlorinated water.
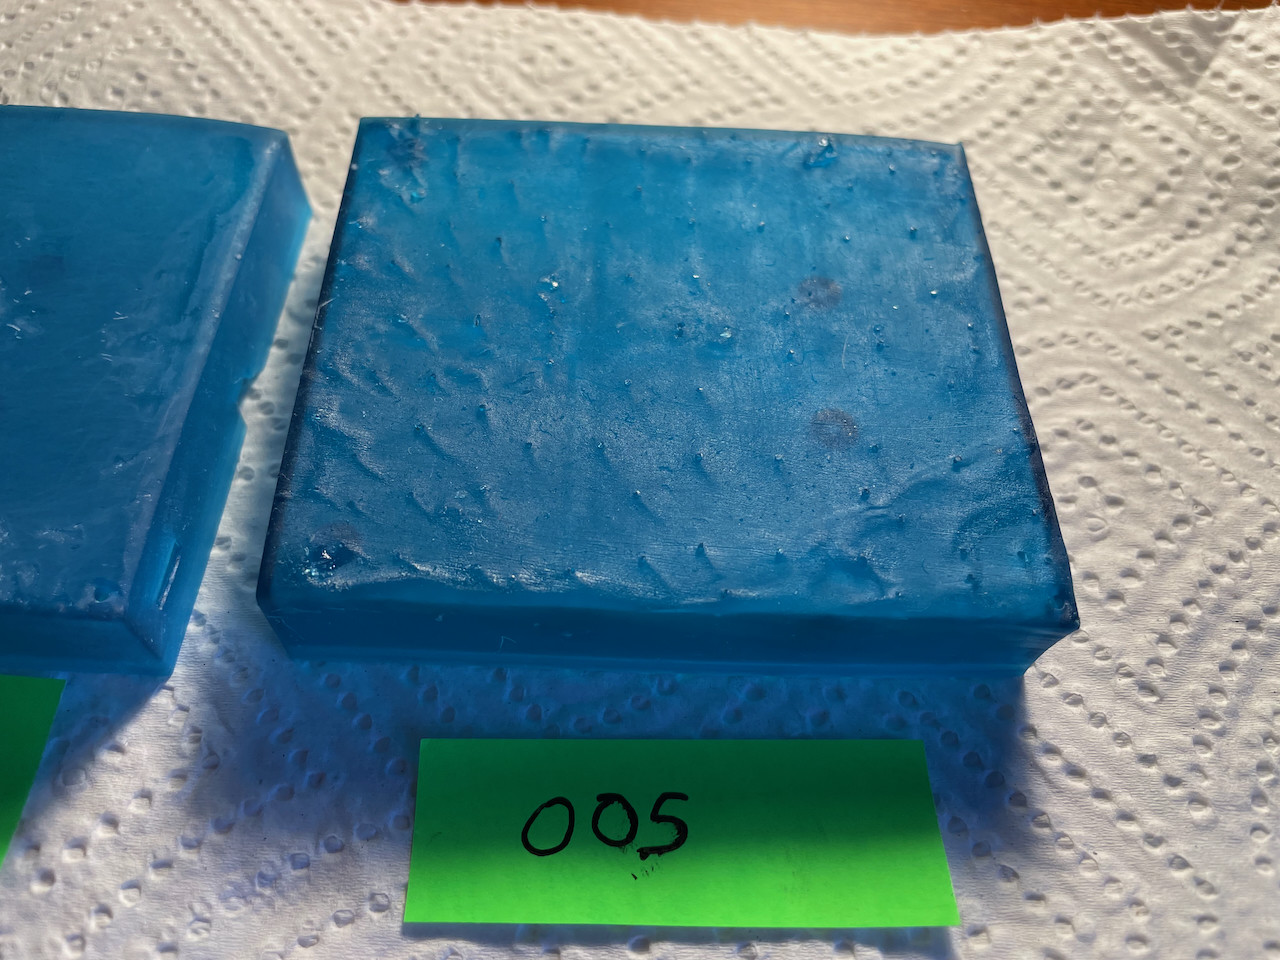
Sample 005, showing surface irregularities and a lack of rectilinear edges around the exterior

$\endgroup$
4
  • $\begingroup$ Can you include screenshot from the slicer, so we can see what orientation and supports you are using? Printer model and resin brand and type could also help. So could temperature in the room. $\endgroup$
    – Mołot
    Commented Apr 21, 2023 at 0:02
  • $\begingroup$ I am using an Anycubic Photon M3, but can only find Creality resins locally. This series of prints used their Standard Plus Transparent Blue. Unfortunately, I have overridden the slicer scene used above; I tried other orientations in the days since. As mentioned, the above (print 005) was tilted about 35/35/0 . I had hoped the uncured resin would run off between the support tips, and the Z=0 put the vertical edges right along pixel boundaries in hopes of obtaining the smoothest surfaces. I've tried about eight orientations now, and I think you're right: this is not a good subject for resin. $\endgroup$
    – JustTryIt
    Commented Apr 22, 2023 at 5:05
  • $\begingroup$ PS: my first print was done flat to the build plate (X/Y/Z/lift : 0/0/0/0) because I had not yet learned about supports. It looked promising - perhaps a tad undercured, and a bit of vacuum lock - but could not be separated from the build plate without fracturing. $\endgroup$
    – JustTryIt
    Commented Apr 22, 2023 at 5:11
  • $\begingroup$ Temperature: Prints 000 - 005 were done in a room about 65 degrees F (18.3C). I moved the printer to a small room with a heater, preheated the bottle of resin, and did a few prints at 75F/23.9C . All failed. I tried black resin, other exposures, inspected my FEP for resin or damage, and tried some more extreme orientations. I just think this enclosure isn't meant to be resin printed. 1.5mm thickness walls, 68x78x11.5mm WxLxH . It's just too flimsy during the print. $\endgroup$
    – JustTryIt
    Commented Apr 22, 2023 at 5:20

1 Answer 1

1
$\begingroup$

Side with supports will always be deformed, at least a bit. Resin printer prints upside down. It pulls on the supports to lift the print from the FEP. But when you print a big flat surface, first layer is only barely cured, and very thin. It acts more like a tablecloth than a plywood. Supports at this stage are also very soft. Imagine you are trying to lift a tablecloth from a table, using only attached strings. How many strings do you need, to be sure tablecloth will not deform? The answer is, it can't be done.

So how to get a flat surface? There are couple of ways.

  1. Print it directly on the bed. Bottom layers exposure must be dialed in just right for print not to fail, but be easy to remove when it's done.

  2. Put side you want to be pretty at the bottom of the print, facing FEP. It'll be shown to be on top on the slicer, because printer works upside down. If ugly side is never to be seen, you don't have to sand it.

  3. Tilt your print 45°. That way you will not need supports on the surface, as now it's printed in many narrow stripes, one built on another, and not as a couple of tablecloths. You would still need some on the edges, especially bottom one for load bearing and on others for support, but significantly less than printing flat.

What method do I use? All of them. I try to design my boxes with a small 45° bevel on the bottom. That way, when I tilt them 45° (point 3) with most important side away from the platform (point 2) I have a flat surface I can put directly on the platform. One that will hardly be seen, so little elephant foot won't bother me that much. Or, more recently, I use a filament printer, boxes are easier to print on them, in my personal experience.

$\endgroup$

You must log in to answer this question.

Not the answer you're looking for? Browse other questions tagged .