10
$\begingroup$

How can I vary the infill percentage for different layer heights of my model?

Context: The bottom part of my model needs about 20% infill. The geometry of the top part of the model (mostly cones of various sizes) prints well with 0% infill and is of course a lot faster to print if I can specify this.

$\endgroup$
2
  • 1
    $\begingroup$ @SeanHoulihane, no that does not work (not in this case), as this works the other way around, it increases infill percentage to the top, instead of lowering it. It would be unwise to print cones up side down, but in that case you are right. Therefore you need to rely on an additional mesh/volume to modify the infill settings using "per model settings", and thus it is a similar question but differently formulated in my opinion. Whether it is a duplicate or not, the community decides. $\endgroup$
    – 0scar
    Commented Sep 30, 2018 at 21:57
  • $\begingroup$ I have updated the answer of Different infill in the same part to include Slic3r. In effect if works similar as it does in Ultimaker Cura. $\endgroup$
    – 0scar
    Commented Oct 1, 2018 at 17:03

2 Answers 2

3
$\begingroup$

Your question is very similar to Different infill in the same part and Using multiple infill types within one model [duplicate]. The difference is that you specifically ask for Slic3r and a variation in layer height infill percentage.


Actually this answer describes using "helper volumes" in Ultimaker Cura to set different properties for certain parts of the model (UPDATE: that answer now includes also Slic3r instructions), but it appears that this answer is very much applicable to Slic3r also. Please read this posting. Quoting from the reference:

Finally, I fired Slic3r up and loaded the main part, then clicked on Settings... and then hit Load modifier... I loaded the new volume as a modifier mesh and I applied 100% solid infill...

Secondly, this answer where 2 different infill percentage sliced models are manually combined at a certain height may also work for you (this is a perfect valid solution for Slic3r, but requires some editing skills).

Basically, although you request for a solution for a slicer other than already described in other questions, boils down to a similar answer, the only difference is the implementation in Slic3r is called differently.


To do this in Slic3r see this reference.

The blog describes the use of a simple volume (the green volume loaded from an STL file). After loading:

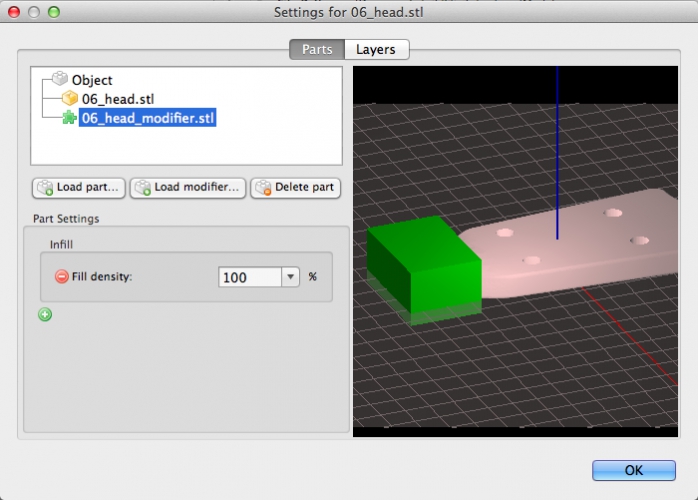
Right-clicking on the main part brought up the object settings menu. From there, clicking "Load Modifier" and selecting the previously saved model adds it to the part as a modifier.

The green "+" was selected and "Fill Density" was added to modifier list and set to 100%.
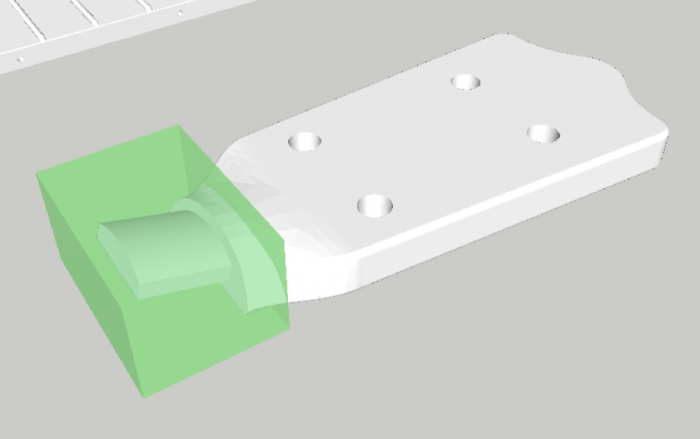
Part with box for alternative mesh infill

enter image description here This shows that the functionality in Slic3r is very similar to the functionality in Ultimaker Cura.

$\endgroup$
1
  • $\begingroup$ @Oscar, thanks for this answer. I will give it a try this evening. Regarding general Stack Exchange operation, if a user's question is flagged as a duplicate, that user receives a prompt to either (a) acknowledge the question is a duplicate or (b) edit the question to explain why it's not a duplicate. That's why I edited my answer. Thanks again for your excellent help! $\endgroup$ Commented Oct 1, 2018 at 17:20
-1
$\begingroup$

Let's assume the model is 75mm high; the bottom portion (which needs 20% infill) is 40mm, and the top portion (which needs 0% infill) is 35mm.

  • Load your model into Slic3r.
  • Be sure your default fill is 20%.
  • Right click on the model, and select Settings.
  • Click "Load Generic".
  • Select Slab. This represents a cube which is the same X,Y dimensions of your model.
  • Specify H=35 (the height of the slab) and Initial Z=40 (where the base of slab starts).
  • This creates a new part for your object. Select it and click "+" to add a new setting.
  • Select Infill/Fill Density and set it to 0%.

As a result of this, the bottom part of your model (which is not enclosed in the slab) will print at the default fill setting of 20%, and the top part of your model (which is enclosed in the slab) will print with 0% fill.

You can verify this by slicing and looking at the preview. You will see the base with your default infill, and the top with no infill. The slic3r docs mentions several other ways to customize parameters for your model.

$\endgroup$

You must log in to answer this question.

Not the answer you're looking for? Browse other questions tagged .