5
$\begingroup$

I have had problems with items sticking on the build plate, especially when they were big (as they didn't stick well, they corners warped -> all kind of problems).

I also wanted to upgrade my printer (Scratch XYCore-Bowden) to have the ability to use flexible filament so first I modified my extruder motor/cog-wheel so it pushes the filament straight into the Bowden tube (classic modification).

This worked okay for small parts (as was the case with PLA).

The heat-bed seems to flex when heating in an uniform manner so it's not perfectly flat which means the Marlin 3-point test doesn't work out.

To alleviate this I added a borosilicate glass on top of the heat bed for perfect 'flatness', but the inductive sensor didn't reach through those extra 3 mm of the glass, so I bought another inductive sensor (old was 4 mm LJ12A3-4-Z/BY PNP with a voltage divider, new is 8 mm NPN) and this started to function somehow:

As the sensor doesn't sense the surface (or the glass at all), but senses the heatbed under, which isn't either flat nor stable according to temperature, I added aluminium tape under the glass pane. This actually works perfectly well!

Now I am able to tune in the first layer distance really well, but still the flex filament floats around on the glass so I added blue painters tape which makes it work, very very well!

All well for flex printing!

Switched to PLA (which always worked okay whatever some small errors in print height, and not too wide items) and I have all pieces sticking to the bed in a manner I just cant get them off...

They get big scratches from the pincers, get broken, etc.,...

I have tried:

  • Pincers (works for some items, doesn't work for some. About always makes marks);

  • Ripping off the blue painter tape (the tape was removed everywhere except where the item was stuck. Plus now I have to add new tape);

  • Chuck the build plate in the freezer for an hour. It helps a lot but:

    1. Still not easy to remove without making marks;
    2. It's a serious hassle;
    3. It's also a time waster.

My question is: How can you both reliably print and remove your item without breaking it?

Little image of the last part that I broke (the square impact in the middle is after ripping of the "hook" from this hanger when I tried to detach it from the heat bed), as it didn't work at all I had to put it in the freezer for an hour or so to be able to remove the rest:
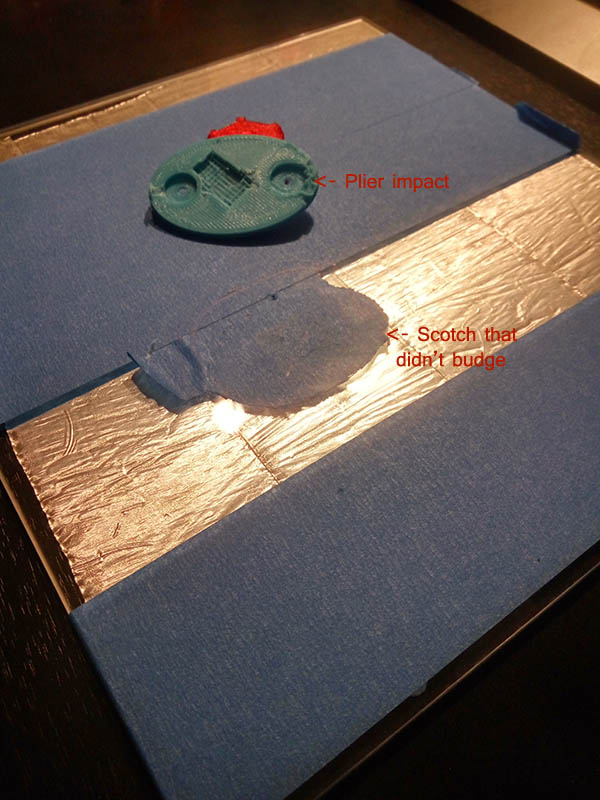
Print damaged during removal

$\endgroup$
0

6 Answers 6

5
$\begingroup$

If your print is sticking too well, try printing directly onto the glass.
If then, your print isn't sticking well enough, try using something like a glue stick instead. Most people use a paint scraper (a small one, like this) to remove prints from build surfaces.

$\endgroup$
2
  • $\begingroup$ Hey @craftxbox, I want to note that you can post images in your answers. That will allow your answer to last the test of time, in case the one you link is taken down. You can get free use images off wikipedia easily. $\endgroup$ Commented Jun 8, 2018 at 0:10
  • $\begingroup$ Thank you for telling me that i can do that @StarWind0, i had absolutely no clue SE allowed that $\endgroup$
    – craftxbox
    Commented Jun 9, 2018 at 0:31
5
$\begingroup$

If you're ever in doubt regardless of what project you're working on... Tooth Floss. You need the good old-fashioned braided kind, none of the new "Pro Glide" elastic stuff. Pull a piece taut and just start sawing back & forth against the bottom layer in different areas (corners work best)... and you'll be on your way in very little time.

$\endgroup$
4
$\begingroup$

A bit of rubbing alcohol dripped on the print edges may help, especially if the print is still warm. Wait about 30 seconds and then gently pry up using knife-edge tool. If this technique works for you, dilute alcohol in a spray bottle or just buy a window cleaner. If you are designing models, minimize base area and always use a base layer fillet of about 0.5mm-1.0mm to permit knife-edge access.

$\endgroup$
3
$\begingroup$

First if you print directly to the glass with a glue stick, over time there will be enough oil build up that you will not have this issue.

Following, if the change in heat temp on a bare glass is not enough to pop it off, I personally use a thin strong blade, specifically a leather cutting blade. Note this blade will through mats with ease. That said that blade is made to cut leather, your thumb is easier to slice by a lot.

Last if you cannot do these, then simply print a few raft layers and don't worry about damaging at the removal point.

$\endgroup$
2
$\begingroup$

For PLA, I usually use hairspay directly on the glass, it keeps the object attached but is not at all a strong glue, sometimes I facilitate the part removal washing it under flowing water.

As OyaMist wrote, a small fillet in the perimeter helps because you actually want to push your object perpendicularly to the bed, and therefore you need to have some grasp point for the blade.

If this is not available and/or when an object is really impossible to remove otherwise, I use this technique:

  • Remove the glass with the object still attached;
  • Find a robust piece of furniture with a flat top and a (smooth) vertical wall;
  • Put the glass as high as possible but still pushed against the vertical wall; (the object must be on the furniture-side of the glass)
  • Move down the glass, a quite fast but still controllable movement.
  • The object is supposed to hit the furniture's flat top while the glass is sliding on the vertical wall.
  • The object will receive an impact, not a force, from the side.

Since this is more an impact than an applied force, the adhesion layer can't resist as a whole surface, but only the surface near the hit point can actually do something. That's the same concept of fixing a nail into wood, if you can only push you'll need a lot of force or -that's why we use hammers- you can just apply some relatively small hits. In fact, I usually see (maybe after few movements) that the object start to detach in some spots, then I can proceed with the paint scraper or I can just continue this way.

Be careful not to drop the glass, of course. :)

$\endgroup$
4
  • $\begingroup$ This technique is highly questionable! I am not sure what you are describing but it sounds dangerous. $\endgroup$ Commented Jun 6, 2018 at 15:49
  • $\begingroup$ @StarWind0: which kind of danger do you see? Except, of course, to drop and broke the glass. I do admit that this could be a danger, but it's not more threatening than having glass jars on an high shelf. $\endgroup$
    – theGarz
    Commented Jun 7, 2018 at 13:45
  • $\begingroup$ Well, do you apply force to a jar while it is over head and apply movement? I think you are trying to apply force from multiple directions. Or generate heat. The main issues are, Glass cracks under pressure. Print pops off and pane falls, slips or goes flying. Both of these are involving glass accident with you looking up with glass over head. $\endgroup$ Commented Jun 8, 2018 at 0:05
  • $\begingroup$ Unless some magic is involved, yes, sometimes you do apply force to a jar and -if enough force is applied in a profitable direction- you'll cause a movement. That's exactly what happen when you place anything anywhere, even a glass jar on an high shelf. I don't apply force from multiple direction nor i'm trying to generate heat. I'll try to explain technique better in the answer, because if you understood the procedure you won't consider a leather cutter a safer option. PS: Glass actually do perform very well under pressure! $\endgroup$
    – theGarz
    Commented Jun 8, 2018 at 7:51
0
$\begingroup$

Technology has come to the rescue here. New printing surfaces are available that release PLA very easily. I am using the WhamBam system. A magnet is stuck to the AL bed. A flex steel sheet is placed on the magnet. The flexsteel has a PEX sheet stuck to it.

After levelling the bed, a print is done normally. When done, the flex steel sheet is lifted off the magnet. After cooling a minute or two, give the steel a little flex across the two sides, and the piece pops right off.

I've posted a video at this Stack Exchange topic

Printing PLA on PEX surface - is heated bed needed?

$\endgroup$

You must log in to answer this question.

Not the answer you're looking for? Browse other questions tagged .