4
$\begingroup$

I'm printing a Soma cube I found on Thingiverse -- it's a puzzle toy I remember from the early 1970s, and the kind of thing that ought to be really easy-peasy to print. Each of the seven pieces is made of four cubes (or three for one piece) joined face to face in every possible combination, so that they can be assembled to make a single 3x3 cube (the claim in the day was, in literally tens of millions of ways -- though many of those were reflections or rotations of others).

Problem is, in order for the seven pieces to fit together correctly to make the 3x3 cube, they have to be flat and square on all faces, and dimensionally accurate.

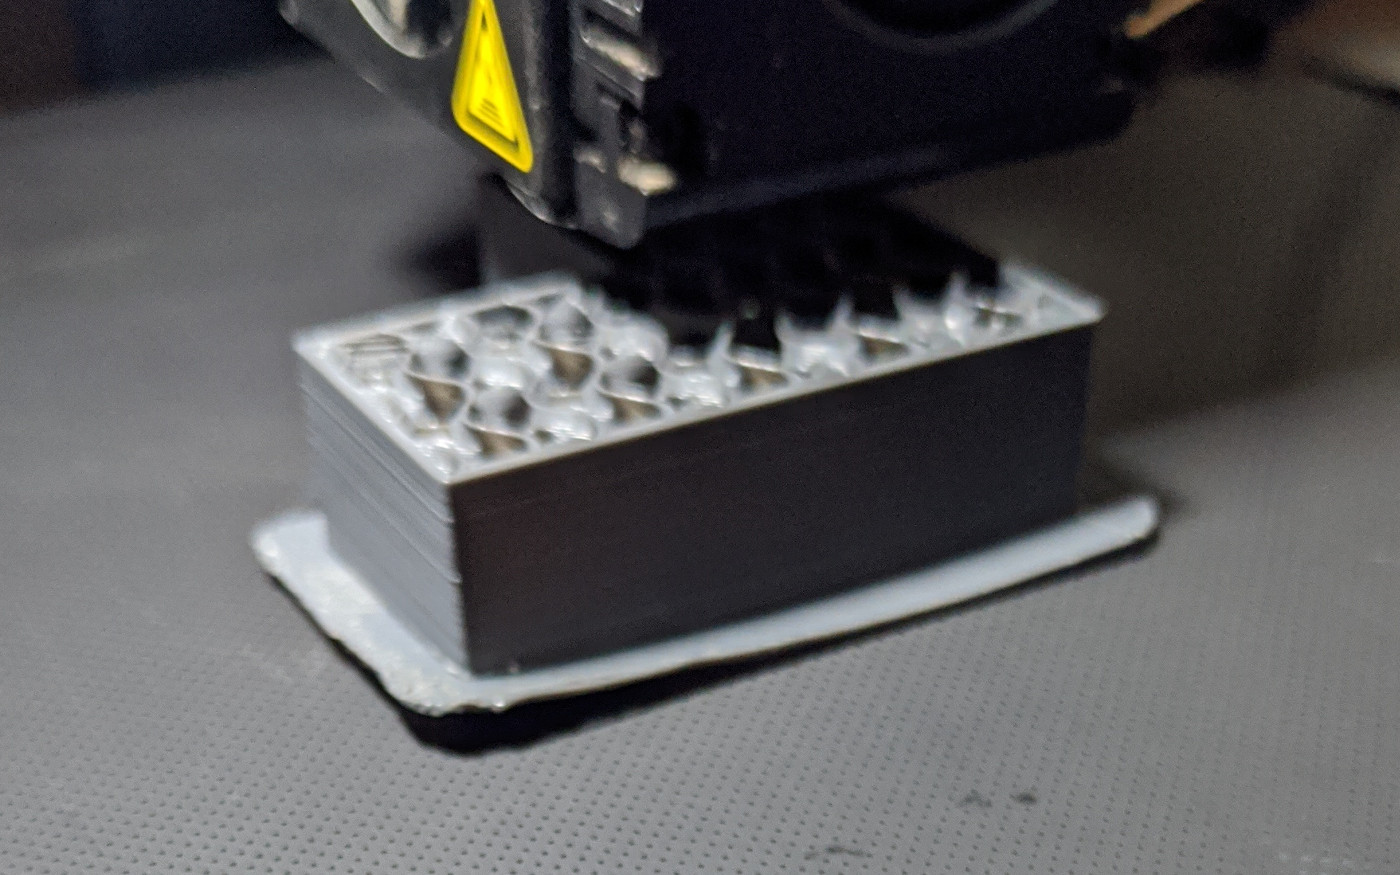
I have an Ender 3 that's just a few weeks old (first print was May 8th to 9th of this year, also my own first 3D print). I'm printing these parts in gray Amazon Basics PLA at 200 °C, with the Creality coated glass build surface at 55 °C. I'm printing on a raft; the first layer goes down well, but over the course of the first forty or so layers, I get this:

Raft lifting from build surface

I presume this is due to the upper layers shrinking, though the horizontal dimensions look fine at the level where I stopped the print. I have Cura Slicer 4.9.1 set to print with no part cooling for initial layer, increasing to 100 % at layer 4. When I removed this part (immediately after stopping the print, so the bed was still in the low 50s), it was still stuck fairly well -- except where it had lifted.

What's causing this warping/lifting?
$\endgroup$
2
  • $\begingroup$ You may want to clean very well the bed... maybe you left some grease from your fingers while removing previous prints. PLA shrinks, but it should not affect prints smaller than 10 cm. For info: you can reduce the infill further to save plastic and time, it's not a mechanical part :) $\endgroup$
    – FarO
    Commented Jun 22, 2021 at 8:48
  • $\begingroup$ I'm already printing this at 10 % gyroid. Must have some infill, or the top skin will sag. I guess I could cut back to 5 %. Also, I'm getting good adhesion with a brim only at 50 °C. $\endgroup$
    – Zeiss Ikon
    Commented Jun 22, 2021 at 9:11

5 Answers 5

4
$\begingroup$

What's causing this warping/lifting?

The warping and lifting is caused by insufficient adhesion. This can be caused by an incorrect first layer (it is difficult to see the raft, but generally, rafts have no solid bottom, so less adhesion as there is less material), e.g. not sufficiently squished to the plate. Note that a raft is absolutely unnecessary for PLA, you should use it for high temperature filaments that experience a lot of shrinkage, PLA does not.

What you should do is make sure the bed is completely clean and free from grease. Use isopropyl/isopropanol alcohol to clean the bed.

Temperature of the bed should be fine, but you could try to notch it up with 5 °C.

I've seen people use an adhesive between the bed and the print, even on coated beds. But, I can imagine you don't want to try that, it needs more cleaning.

Also, make sure that the printer isn't in front of a window or in the path of an air-conditioning airflow.

$\endgroup$
7
  • $\begingroup$ Printing on a raft, on a Creality polymer coated glass build surface (shouldn't need, and shouldn't use other adhesion agents). $\endgroup$
    – Zeiss Ikon
    Commented Jun 22, 2021 at 9:17
  • $\begingroup$ @ZeissIkon So the answer is still valid, you should clean it properly, add more heat and optionally an adhesive, I've seen people use it like that. The answer is that you do not have enough adhesion. I accidentally typed brim where I meant raft. Note that a raft is necessary for high temperature filaments, not PLA, you should print directly onto the sheet of glass. $\endgroup$
    – 0scar
    Commented Jun 22, 2021 at 10:35
  • $\begingroup$ My rafts were lifting with PETG on both the coated glass bed and the textured magnetic sheet at 75 C, as well, but I didn't get a picture of that. $\endgroup$
    – Zeiss Ikon
    Commented Jun 22, 2021 at 11:40
  • 1
    $\begingroup$ You should not need more heat. I print PLA pretty much exclusively on an unheated bed. $\endgroup$ Commented Jun 22, 2021 at 21:06
  • 1
    $\begingroup$ @R..GitHubSTOPHELPINGICE yes but the small contraction which happens when cooling down after print on a 40-50 °C heated bed helps detachment. Indeed PLA works on cold surface too. $\endgroup$
    – FarO
    Commented Jun 23, 2021 at 7:45
2
$\begingroup$

You need to get a little closer in your first layer. I have this same machine (and several others). You shouldn't have that problem with PLA, it's a lot more common with ABS.

So if it's pulling away from the bed, it hasn't adhered all the way, to begin with. Try micro stepping closer with the firmware or just hand adjusting the wheels a slight amount closer and get a good first layer smoosh!

If you need more help with this printer, I have a whole playlist of videos specific to it at on YouTube that should be of help to you!

Layer adhesion comparison chart

$\endgroup$
3
  • $\begingroup$ I've been setting to effectively zero clearance -- Z step to 0.075 mm and set nozzle tight on a 0.08 mm feeler gage. All first layer thickness is in the slicer. $\endgroup$
    – Zeiss Ikon
    Commented Jun 22, 2021 at 18:23
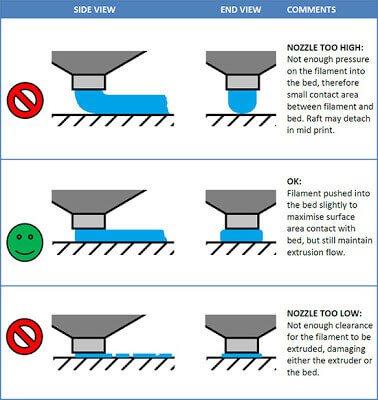
  • $\begingroup$ yes its is programmed to a certain height in the slicer, and it calculates its extrusion rate based on that and speed and other things. you dont want it to actually come out at that height though, you need to compress the first layer. see the picture. $\endgroup$ Commented Jun 22, 2021 at 18:35
  • $\begingroup$ With effectively 5 micron plate clearance, and the slicer set with wider than 0.4 mm line width (and IIRC 0.3 mm first layer height), and 95% first layer extrusion (for elephant foot control). My first layer on the print above went down well. Aside from elephant foot, I think Cura's default settings for Ender 3 are just about right. $\endgroup$
    – Zeiss Ikon
    Commented Jun 22, 2021 at 18:44
2
$\begingroup$

If you know that the bed surface is clean and that the filament and the bed material are compatible (as in this case), you may want to optimise the bed temperature.

It is known that the plastic shrinks a little, so the upper layers pull and the bottom layer has to hold everything flat. It happens also with PLA.

Too hot bed? sometime adhesion is increased, but the first layer is soft and all the flatness work is held by the adhesive. It will likely fail.

Too cold? the first layer will hold well its shape, but little adhesion will result in it failing.

If you can't reach a good adhesion, you have to optimise the bed temperature yourself. Print a wedge at different bed temperatures and pick the best result.

See here for the detailed instructions and here for an explanation.

For information, from personal experience sometimes I had better adhesion by lowering the temperature. For example, 75 °C for PETG seems definitely too much to me, because at that temperature PETG has almost no rigidity. The same with nylon: at 100-120 °C I couldn't get it to work. At 80 °C I could get some results. PETG at 60 °C is good, PLA at 50 °C max, ABS up to 110 °C but 100 °C may be already good (the issue is different with ABS)

$\endgroup$
1
$\begingroup$
  1. What has worked for me is to keep the bed temperature constant at 60 °C. Use a higher extrusion temperature for the first layer to promote adhesion. (Differences in PLA composition could cause these temperatures to vary.)

  2. Sometimes it helps to have an bed temperature for the 1st layer as high as 75 °C to promote adhesion. While depositing the first layer with this bed temperature promotes adhesion, leaving the bed temperature this high actually decreases it, besides risking the print sagging under its weight.

  3. Additional adhesion layers such as glue sticks might help.

  4. If not already using it, less stiff fill patterns (rectangular) can help, as well as a lower percentage fill.

$\endgroup$
0
1
$\begingroup$

Increase bed adhesion and/or decrease temperature gradient over the part. As the object builds, and it gets further away from the heated build plate, the plastic gets colder and shrinks. The bottom stays warm and does not shrink, this makes the part want to bow/warp. At the plastic’s glass temperature, where it transitions from liquid to solid (PLA is 60 °C), it has little shrink. That’s why heated beds stick to the plastic, but as it cools the object pops off-it shrinks and breaks the bond.

Other answers have good advice-clean oils off the bed, ensure the first layer is squished into the bed. Ensure the bed is level, so the first layer is squished down uniformly. I would disagree that an adhesive is not necessary. I use a glue stick and it works, where glass alone couldn’t keep my corners stuck down. It is common to run a 60 °C bed for the first PLA layer and cool it off 5 degrees, as a little cooler can still adhere but have less tendency for the part to “elephant foot” from the bottom layers being too warm and gradually deforming. Your 55 °C seems fine, you could still cool it off to 50 °C. I don’t think there is any benefit to running it extra hot (unless the glass surface runs cooler than the bed thermistor reports) as it will be more prone to elephant foot the part.

What I felt compelled to add to the other answers is that if the upper layers aren’t as cold, i.e. they are closer in temperature to the bed layers, less of a temperature gradient over the part, they won’t shrink as much and will have less strength to warp and peel up the corners. I’ve used a couple of 150 W heat lamps, shining at the bed, and have been able to print big flat objects without a brim. It especially helps in the winter. The cooling fans, while they help the print quality, increase the coldness/shrink of the upper layers. I think it would be worthwhile to try less cooling fan, so long as the object doesn’t deform/sag. Often the same corner will lift; if something makes it cooler on that corner, like the cooling fan blows on it longer, the heat break fan blows on it, or it’s draftier. If so, a different part orientation could possibly help.

One nuclear option you can try on large flat prints, if you just can’t keep the brim or raft stuck down with adhesive and whatnot, is to pause a few layers in, and tape the brim down with painter's tape.

$\endgroup$

You must log in to answer this question.

Not the answer you're looking for? Browse other questions tagged .