5
$\begingroup$

My first attempt to print in ABS has been an unmitigated disaster, and I could do with some advice before I try again.

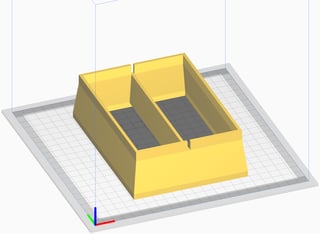
I've been trying to print a Bean Hopper Extension for Melitta Barista TS Smart coffee machine, but every time the layers separate, usually at or near a corner.

Bean Hopper Extension for Melitta Barista TS Smart

My first attempt had it lifting from the bed before a few layers had completed. When I tried it with a thin brim on the outside, it stuck down for a while, but eventually started lifting away from the bed. When I tried it with a raft, it got further, but then the print detached itself from the raft at one corner. My final attempt used a wider brim on both inside and outside, and it managed to get even further through the print. None of the brim had detached from the bed, but then I noticed layers higher up pulling apart, and when I eventually cancelled the print, I saw it had started separating earlier and managed to recover in later layers.

At this point I gave up and printed it in PLA, first time, but I would like to understand what I can do to improve my chances of printing this next time.

Also, I plan to redesign this with the outer wall extending straight up to the level of the bottom of the notch, with a flat top in which I intend to add a channel for a rubber seal. Will widening of part of the model cause more problems for an ABS print, or will it help strengthen it and prevent it separating as before?

I'm using an Ender 3 V2 with a heated bed, using Prit-stik as my bed glue.
$\endgroup$
4
  • 3
    $\begingroup$ ABS needs an enclosure, ABS shrinks a lot when cooling down. Have you tried that? $\endgroup$
    – 0scar
    Commented Jun 15, 2021 at 23:01
  • 1
    $\begingroup$ Nice question, and the detailed description doesn't really need one, but (just for academic purposes), would you happen to have a photo (or two) of the moody ABS layers (or the lifting from the bed) to hand? $\endgroup$
    – Greenonline
    Commented Jun 16, 2021 at 5:07
  • $\begingroup$ See my answer, but really... ABS? get ABS+ or ASA, they warp much less. $\endgroup$
    – FarO
    Commented Jun 16, 2021 at 7:40
  • $\begingroup$ ... or use PETG (or any other modern co-polymer) $\endgroup$
    – 0scar
    Commented Jun 16, 2021 at 12:21

3 Answers 3

6
$\begingroup$

First of all, the bed should be at 100-110 °C and fan 0 %.

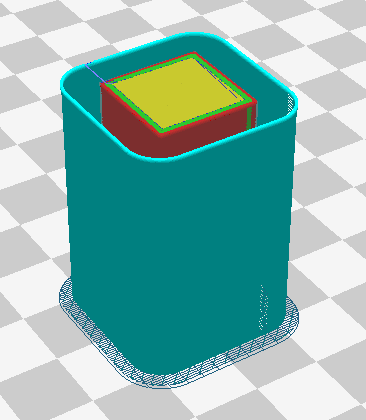
I had incredibly good results by using a (sacrificial) "draft shield" as shown below together with a large brim (10 mm). It creates a warmer micro-climate which keeps the print a bit warmer, with much less warping. My printer bed back then was 130x130 mm, therefore drafts were strong. You will get even better results, you have about 200x200 mm.

enter image description here

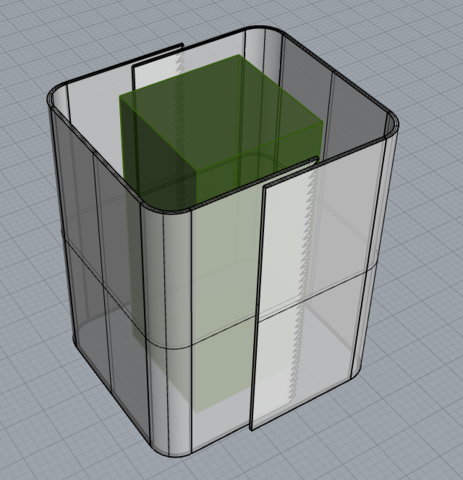
If you were able to add something like this, it would be even better:

enter image description here

You can get it by designing in Fusion 360 or anything else a "U" shaped part, which you will add twice to each print and scale accordingly.

The reason is that the normal draft shield will deform a lot and detach from the print bed at least in part, resulting in an opening at the bottom and a chimney effect which reduces the effectiveness of the shield. With the two U parts, it won't happen as easy.

The draft shield is the first thing to try.

You can also add a "shield" out of cardboard around the printer. You don't need to close the top, it will work quite good.

You can also get 2-4 20-40 W halogen lamps (from a car, for example, they run already at 12 V, but don't connect them to the same power supply as the printer!) and point them at the part. If you have two, mount them at the two sides of the horizontal gantry: they don't need to move horizontally, only vertically. They will keep the part quite warm without the need of an enclosure (but it would help). If you have 4 mount them maybe at the corners of the bed, hoping the shaking won't kill them too quickly.

The solutions I listed so far result in better prints, but also in stronger prints because they reduce the causes for warping. The halogen lamps, in particular, keep the printed part quite hot and do wonders.

Another solution which is the easiest and which works extremely well but which weakens the print because it only hides the warping is to use Dimafix on the bed. The print will stick like there is no tomorrow (bed temperature above 90 °C) but the stresses are still there and the print may split in the middle between layers, if it's tall.

$\endgroup$
4
$\begingroup$

You make no mention of a heated enclosure, so I assume you aren't using one. ABS undergoes significant contraction as it cools down. If you're not using an enclosure, the temperature differences between the heated bed, the cool middle of the print, and the heat of the freshly-printed plastic will cause severe warping.

$\endgroup$
2
  • 1
    $\begingroup$ Not necessarily. You can avoid warping with some tricks $\endgroup$
    – FarO
    Commented Jun 16, 2021 at 7:40
  • $\begingroup$ @FarO A draft shield is also creating a heated enclosure! ;-) $\endgroup$
    – 0scar
    Commented Jun 16, 2021 at 8:20
3
$\begingroup$

If you are printing very thin walls, corners can be difficult. Rounding the corners helps. Also, if you can leave the outside square, but round the inside (making the corner slightly thicker), this can help.

$\endgroup$

You must log in to answer this question.

Not the answer you're looking for? Browse other questions tagged .