8
$\begingroup$

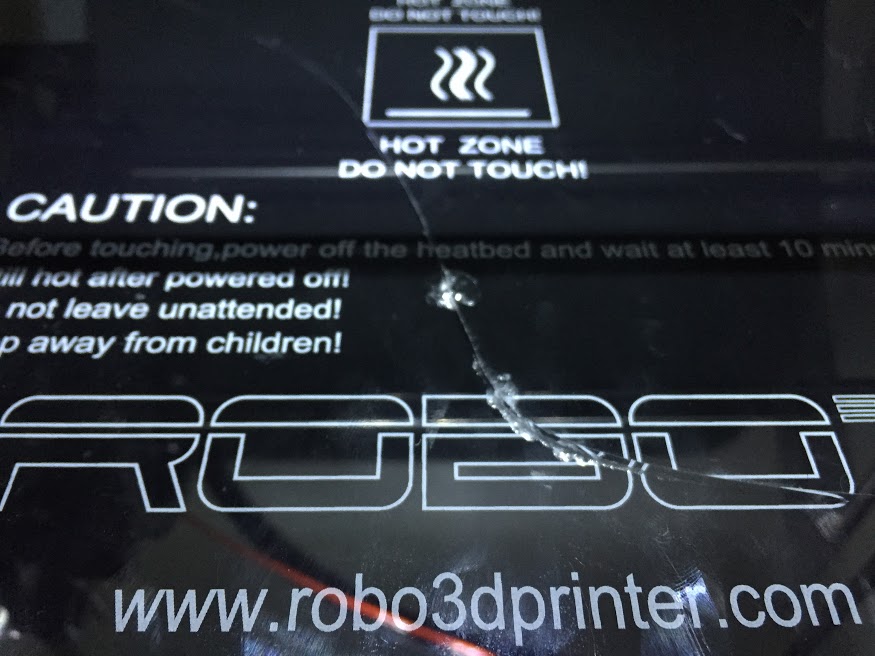
I have a Robo 3D. However A while ago, the print bed was fractured, and now it has a long crack cutting it in half. The bed still works because it is held together, by the screws holding the bed to the tracks. So I want to continue using it, because it still is fairly good, the heating element works fine, and a replacement bed is 80$, and I am unsure if the one sold on the RoBo 3D website will be compatible with my printer as I don't have the R1, but a version before that.

My cracked bed, with crack running straight through the center

So my question is: How can I best align the two glass fragments, to provide as flat a print surface as possible, and two how to best hold these two pieces in place, or if it would be best to invest in a new print bed?

EDIT: Here is a image of the heating element as well to explain the situation with how it is attachedThe heating element attached to the underside of the glass print bed
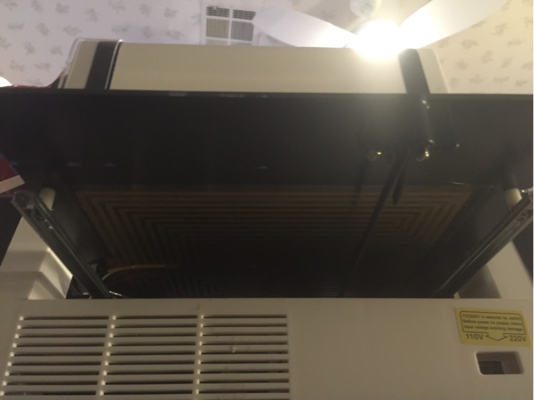
EDIT: The RoBo 3D team have said that I just need to upgrade my y-axis with a object on thingiverse and then buy their new build plate. So I am going to experiment with a glass replacement, and if that fails to succeed then I will go along with their suggestion, and buy the upgrade. Thanks everyone for their help.
$\endgroup$
2
  • 1
    $\begingroup$ Hi, Arden. Does the glass stick to the heated bed somehow, or could you potentially replace the broken glass without also replacing the heated bed? $\endgroup$ Commented Feb 3, 2016 at 6:23
  • 1
    $\begingroup$ It appears that on this model, the heating element is part of some adhesive that is attached straight to the glass printing bed. There is a possibility that I might be able to remove it, but not a chance that I want to take $\endgroup$ Commented Feb 3, 2016 at 14:44

5 Answers 5

4
$\begingroup$

A little chip is fine, but I wouldn't print with that big of a crack. However, that doesn't mean you need to spend $80 on a new sheet of glass.

Option #1- If you want borosilicate glass, you can get a sheet from either McMaster (about $40+shipping for a 10"x10" piece, less for smaller) or from a local glass maker (the price varies a lot, so you should check that also if you want to go that route). However, you won't be able to drill holes (tempered glass will break of you drill a hole). Borosilicate glass has the advantage of being extremely heat-resistant, so it won't break from thermal expansion. If you go this route, you should pick up a few binder clips also to attach the sheet to the heated bed.

Option #2- You might be able to get picture frame glass from a hardware store. It's super cheap (mine was $3 or something from lowes) and they'll often cut it to exact size. You might be able to drill this, but you have to be extremely careful. Sometimes, the hardware store can drill holes in the sheet for you if needed. If you don't want to drill, a few binder clips will work just as well.

Just a note for if you are using binder clips: you might need to (depending on how your hbp is set up) get a piece of glass that is slightly smaller to allow for any bed leveling screws to have room. If you're going with the picture frame glass, you should make sure that the glass will be entirely within the heated part so that there isn't any heat gradient (that's how glass cracks/shatters).

$\endgroup$
4
$\begingroup$

Replacing your bed is the safest option, especially if you have a heated bed. Cracks and chips in the glass create an uneven surface for your prints, and can become a safety hazard; additionally, while borosilicate glass is very resistant to thermal shock, it can continue to crack or shatter when subjected to rapid/uneven temperature variations after damage. Borosilicate glass tends to break in large pieces rather than shattering (snap instead of splintering), but it's still a safety hazard.

It sounds like you have the Kickstarter version of the Robo3D R1; the current glass bed on the Robo3D uses magnets to hold the bed in place, so you'd probably need to replace your Y axis rails along with the bed. I would contact Robo3D support to see what options you have available for upgrading the bed and rails through them.

Aside from Robo3D, you have a few options: - If you plan to continue using the bed, Kapton tape is an effective surface application for general printing. It's very thin, but provides an effective surface for ABS & PLA adherence, works with heated beds, and is compatible with secondary adherence items (blue masking tape, PVA glue, ABS slurry, etc). Kapton tape can be damaged after several prints, so plan on having several sheets on hand. - You can replace your current borosilicate glass with a new sheet of borosilicate glass from a secondary source - Aluminum plates are an effective replacement - Lexan sheets also make an effective replacement, but I wouldn't recommend applying heat to them.

$\endgroup$
2
  • $\begingroup$ Thanks for the suggestion I am waiting for their reply on the request for replacement part. And if that doesn't work, then I will look into the Kapton tape. $\endgroup$ Commented Feb 3, 2016 at 15:42
  • $\begingroup$ NP. You should also think about adding a piece of cork over that heating element, it'll help insulate the coil and improve the heating of the bed. $\endgroup$ Commented Feb 3, 2016 at 19:54
3
$\begingroup$

IMHO your best bet is to use some kind of a tape. I do not have any experience with robo3dprinter but, I have been using glass with PET tape on in for past 4 years.

I have seen guys using Kapton tape as well. Never tried.

The main disadvantage on this solution is increasing the bed thickness, I am not sure if you are able to tinker with the Z level endstop, in case not this migh be an issue.

The other solution you can try is replace your bed with piece of glass and then apply PET tape or any other kind, I am also not sure if you are able to replace the bed print surface of not.

When using glass and PET tape, you need to get the surface of PET tape rough using sand paper, and you might have to apply so called Acetone Juice to make sure that your ABS prints will stick to the bed.

Acetone juice is basically Aceton with disolved piece of Natural ABS plastic this created sticky layer on your bed that helps to hold your prints on the bed while printing.

$\endgroup$
2
  • $\begingroup$ That was the solution that I have been using in the past, but I wanted to eliminate the necessary price for purchasing new tape. If I am unable to find a solution for the glass bed, then that is what I will return to using. And I am able to adjust the Z level end stop. Thank you for the suggestions of different kinds of tape. I have been using blue painters tape, and that has a fairly hefty price tag sometimes. $\endgroup$ Commented Feb 3, 2016 at 14:47
  • $\begingroup$ @ArdenRasmussen I see. Honestly I am not really su that you can fix the broken glass anyhow. You better prepare for replacing it either for original one, or just one cutted from nearby glassmaker. Does your maschine at least allow you to position your print where ever you want? Or do you have to print from middle? Have you tried to apply warranty in matter of this issue? $\endgroup$ Commented Feb 3, 2016 at 16:16
1
$\begingroup$

If your heatbed itself is aluminum/copper/other metal: Get a glass cut and replace it. The current one is probably attached to the heatbed with adhesive glue. If it the adhesive is cyanocrylate based, you can remove by rubbing with acetone. If silicone type, it will come off by some force. Don't worry, you won't damage aluminum. THe heating element is either inside the aluminum or under it. If it's not alumunum it's likely a PCB heatbed. Then I wouldn't suggest to use acetone or some "antiglue" and would just try to apply a little force and see if the glass moves a bit. If no, don't bother, PCB heatbeds can break too. Then I'd just suggest to apply some epoxy to cover the holes surrounding the cracks and keeping the glasses uniform.

Also, about replacement glasses: picture frame glasses are very cheap. McMaster sells some high quality bearings and rods, but for glass there's no point to waste money. $5 is typical for that size borosilicate glass, if you're in USA (I'm not) I think your local Home Depot will cut it for free for you as well.

$\endgroup$
1
$\begingroup$

I agree with several others that your best bet is to replace the glass entirely. But short of that, you might try something like Loctite "Glass glue", which is essentially crazy glue for glass. Be sure to level and clamp well while drying, or you'll end up with it permanently not straight of course. You'd want it clamped to a very flat surface, and clamped pushing the broken edges together. But I think I'd just replace it.

$\endgroup$
1
  • 1
    $\begingroup$ If it's cyanocrylate based, you can always remove the glue with acetone if it ends up uneven. $\endgroup$
    – Leo Ervin
    Commented Feb 9, 2016 at 2:33

You must log in to answer this question.

Not the answer you're looking for? Browse other questions tagged .