6
$\begingroup$
  • Printer: Kobra Max
  • Nozzle: 0.4 mm
  • Material: PLA
  • Slicer :Cura

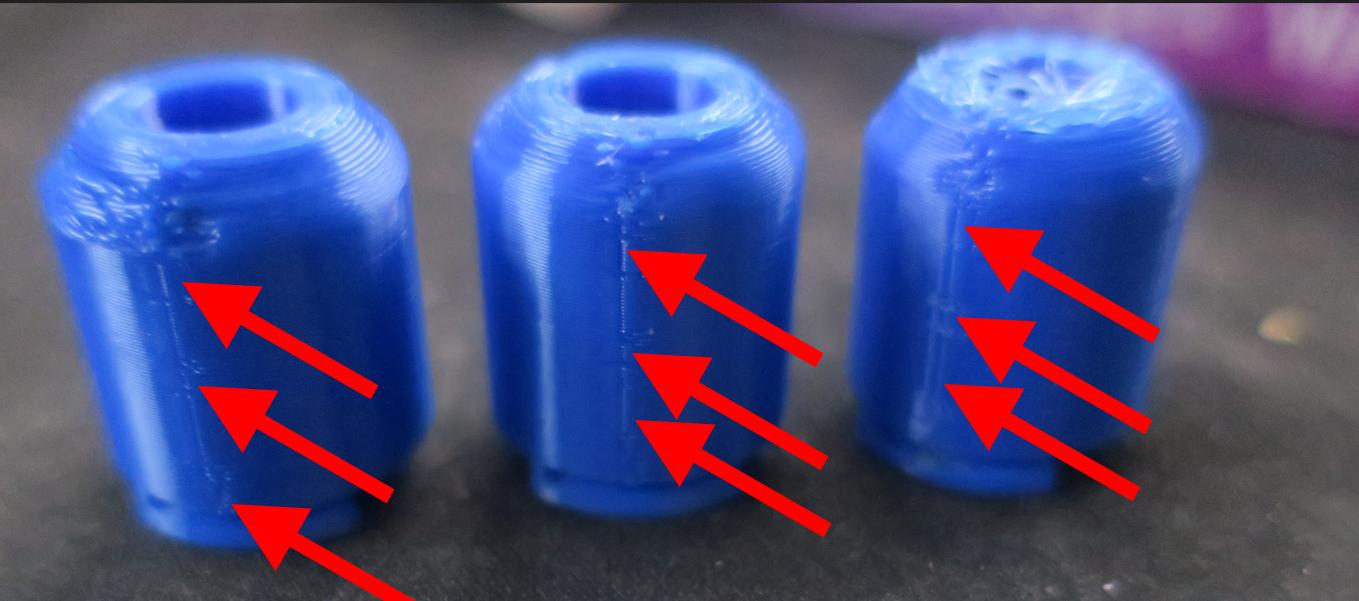
I have printed 1 model 3 times with different settings (different temperatures and different bed temperatures).

  • Try 1: 190 °C / 50 °C
  • Try 2: 210 °C / 70 °C
  • Try 3: 230 °C / 50 °C

All 3 models show a seam.

How / where do I best hide this seam?

Photo of three printed models with the same printing error

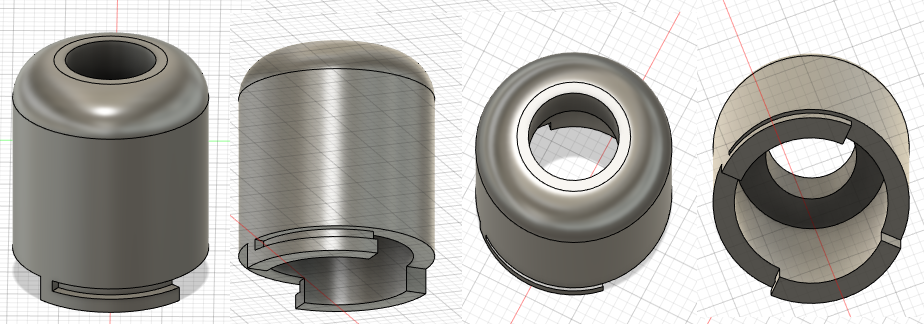
These are some screenshots of the model in Fusion 360:

enter image description here

$\endgroup$
1
  • $\begingroup$ I've also seen an option to hide the seam by burying it inside the part, between walls. However, it is possible Cura doesn't support this? $\endgroup$
    – user10489
    Commented Oct 7, 2022 at 0:17

5 Answers 5

4
$\begingroup$

There are a bunch of possible causes for the seam. But the main one is retraction.

In Cura the main setting affecting this is under 'Travel'.

In the 'Travel' settings is 'Enable retraction', and 'Retract at layer change'.

Retraction pulls the filament up and it doesn't make such a noticeable seam.

$\endgroup$
2
  • 1
    $\begingroup$ Wow, the seam is almost invisible now! Why is that not the default / standard setting? $\endgroup$
    – tmighty
    Commented Oct 6, 2022 at 23:07
  • 1
    $\begingroup$ @tmighty Specifically, the problem with insufficient or disabled retraction especially with materials like PETG is you'll get quite a lot of stringing and it can take forever to clean up the print afterwards. $\endgroup$
    – Bob
    Commented Oct 7, 2022 at 3:44
3
$\begingroup$

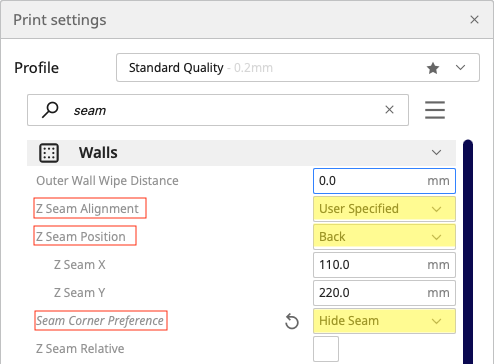
In the Cura settings, search for "seam". This will then display the options to adjust those settings.

Screenshot of Cura settings for 'seam'

Make the following adjustments:

  • Z Seam Alignment to User Specified
  • Z Seam Position to Back
  • Seam Corner Preference to Hide Seam

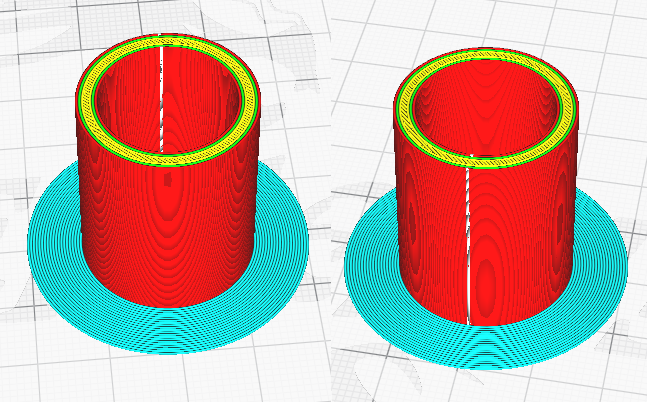
This will position the seam to the best possible position both inside and out.

Screenshot of Cura's Preview for a model with the seam shown in white

$\endgroup$
3
  • $\begingroup$ Thank you! Could you add the fact that one needs to activate showing these settings in the preferences, first? Because for me, they were hidden at first. $\endgroup$
    – tmighty
    Commented Oct 6, 2022 at 22:31
  • $\begingroup$ Oh, and in the Cura version that I installed, these settings were already set / standard. $\endgroup$
    – tmighty
    Commented Oct 6, 2022 at 22:33
  • $\begingroup$ I can mention that but you can just search for the term "seam" at the top of the settings, as is seen in the screenshot. $\endgroup$
    – agarza
    Commented Oct 6, 2022 at 23:33
3
$\begingroup$

With cylindrical objects you cannot hide the seem (as there aren't sharp corners to hide the seam), unless the parts are oriented always facing a certain side.

There are 3 options, one is to face the part with the view you want to display and put the seam at the back with a slicer option, or two, fiddle with the retraction settings to minimize the seem as much as possible, or three, randomize the seam (but this generally doesn't look very well).

$\endgroup$
2
  • $\begingroup$ option 4: grab some files and remove it after printing. Like me. I sand such away. $\endgroup$
    – Trish
    Commented Oct 6, 2022 at 21:09
  • $\begingroup$ I mainly use PETG, sanding doesn't look that well. $\endgroup$
    – 0scar
    Commented Oct 7, 2022 at 7:01
2
$\begingroup$

There are 5 Ways to deal with seam placement

2 ways to place seams deliberately with Z seam alignment: User specified

  • Seam Corner Preference: sharpest corner - this is good to get the seams to one corner, and for boxy prints can make them invisible even. However, this fails for cylinders, as it needs a corner that is discernable sharper than others.
  • Seam Corner Position: Choosing a direction - this fails to remove the seam for cylinders for the same reason, but can help if one side isn't seen usually.

1 way to distribute the seams and blend them in

  • Z seam alignment: random - by distributing the Z-seams randomly, the whole print looks uniform, but you also have the bulges all over the build.

Vase mode is seamless

By activating Vase Mode, the print is automatically printed with a single, continuous shell made from a single, spiraling line. However, such prints can't have overhangs at all and are very thin, making them unusable for most technical applications.

Postprocessing can remove seams

The most common way is to put the seam on a surface where it does not hurt, and then remove it after the print with either a sharp knife, scraper, sandpaper, or needle files. In most technical usages, sanding and smoothing over the layer lines is beneficial anyway, so removing the seam in the same step often isn't too much an extra problem.

$\endgroup$
2
  • $\begingroup$ Removal works if the seam is a bulge, but if you printer is well-tuned, it's more likely to be just a really thin groove. $\endgroup$ Commented Oct 6, 2022 at 22:51
  • $\begingroup$ @R..GitHubSTOPHELPINGICE depending on the project, a slight bulge is preferential as you don't need to add filler, but indeed, a grove is possible, but can risk 'start problem' on some printers. $\endgroup$
    – Trish
    Commented Oct 6, 2022 at 23:21
1
$\begingroup$

Hiding the seam isn't really possible when the object is rotationally symmetric. The closest you can get is hiding it "statistically" by distributing the seam randomly so it's fractionally-bad everywhere rather than fully-bad in one place. Depending on your needs, this might be good, or it might be awful. If you're hoping to clean up the seam in postprocessing, it's probably awful since there's not just one isolated point that needs fixing with a razor blade or something, but the whole print surface.

One thing you can try, though, is turning on wipe. In Cura this is "Outer Wall Wipe Distance". Setting it to 1-2 mm can go a long way to concealing the seam, especially if it's not bulging from ooze, which yours doesn't seem to be. Combined with random distribution, this might come out looking pretty good for your particular need.

In general, how to deal with seams depends on whether the problem is cosmetic or functional. I'm assuming in your case it's cosmetic, but if it is functional (affecting fit of mechanical parts together, making a printed gear rotationally asymmetric, etc.) then one trick you can do is make an artificial cut into the surface at an arbitrary point and selecting to put the seam on the sharpest corner. This can help ensure the entire print fits inside the intended print volume, and is only missing a small amount of material on a scale smaller than the functional scale of the print.
$\endgroup$

You must log in to answer this question.

Not the answer you're looking for? Browse other questions tagged .