My setup
- Ender 3
- Creality glass bed
- Creality 3D BL Touch auto bed levelling kit v1
- Creality 3D silent mainboard v4.2.7
- OctoPrint running on a Raspberry Pi 4 connected over USB (with the 5 V pin covered with a piece of tape to prevent powering the mainboard)
Problem
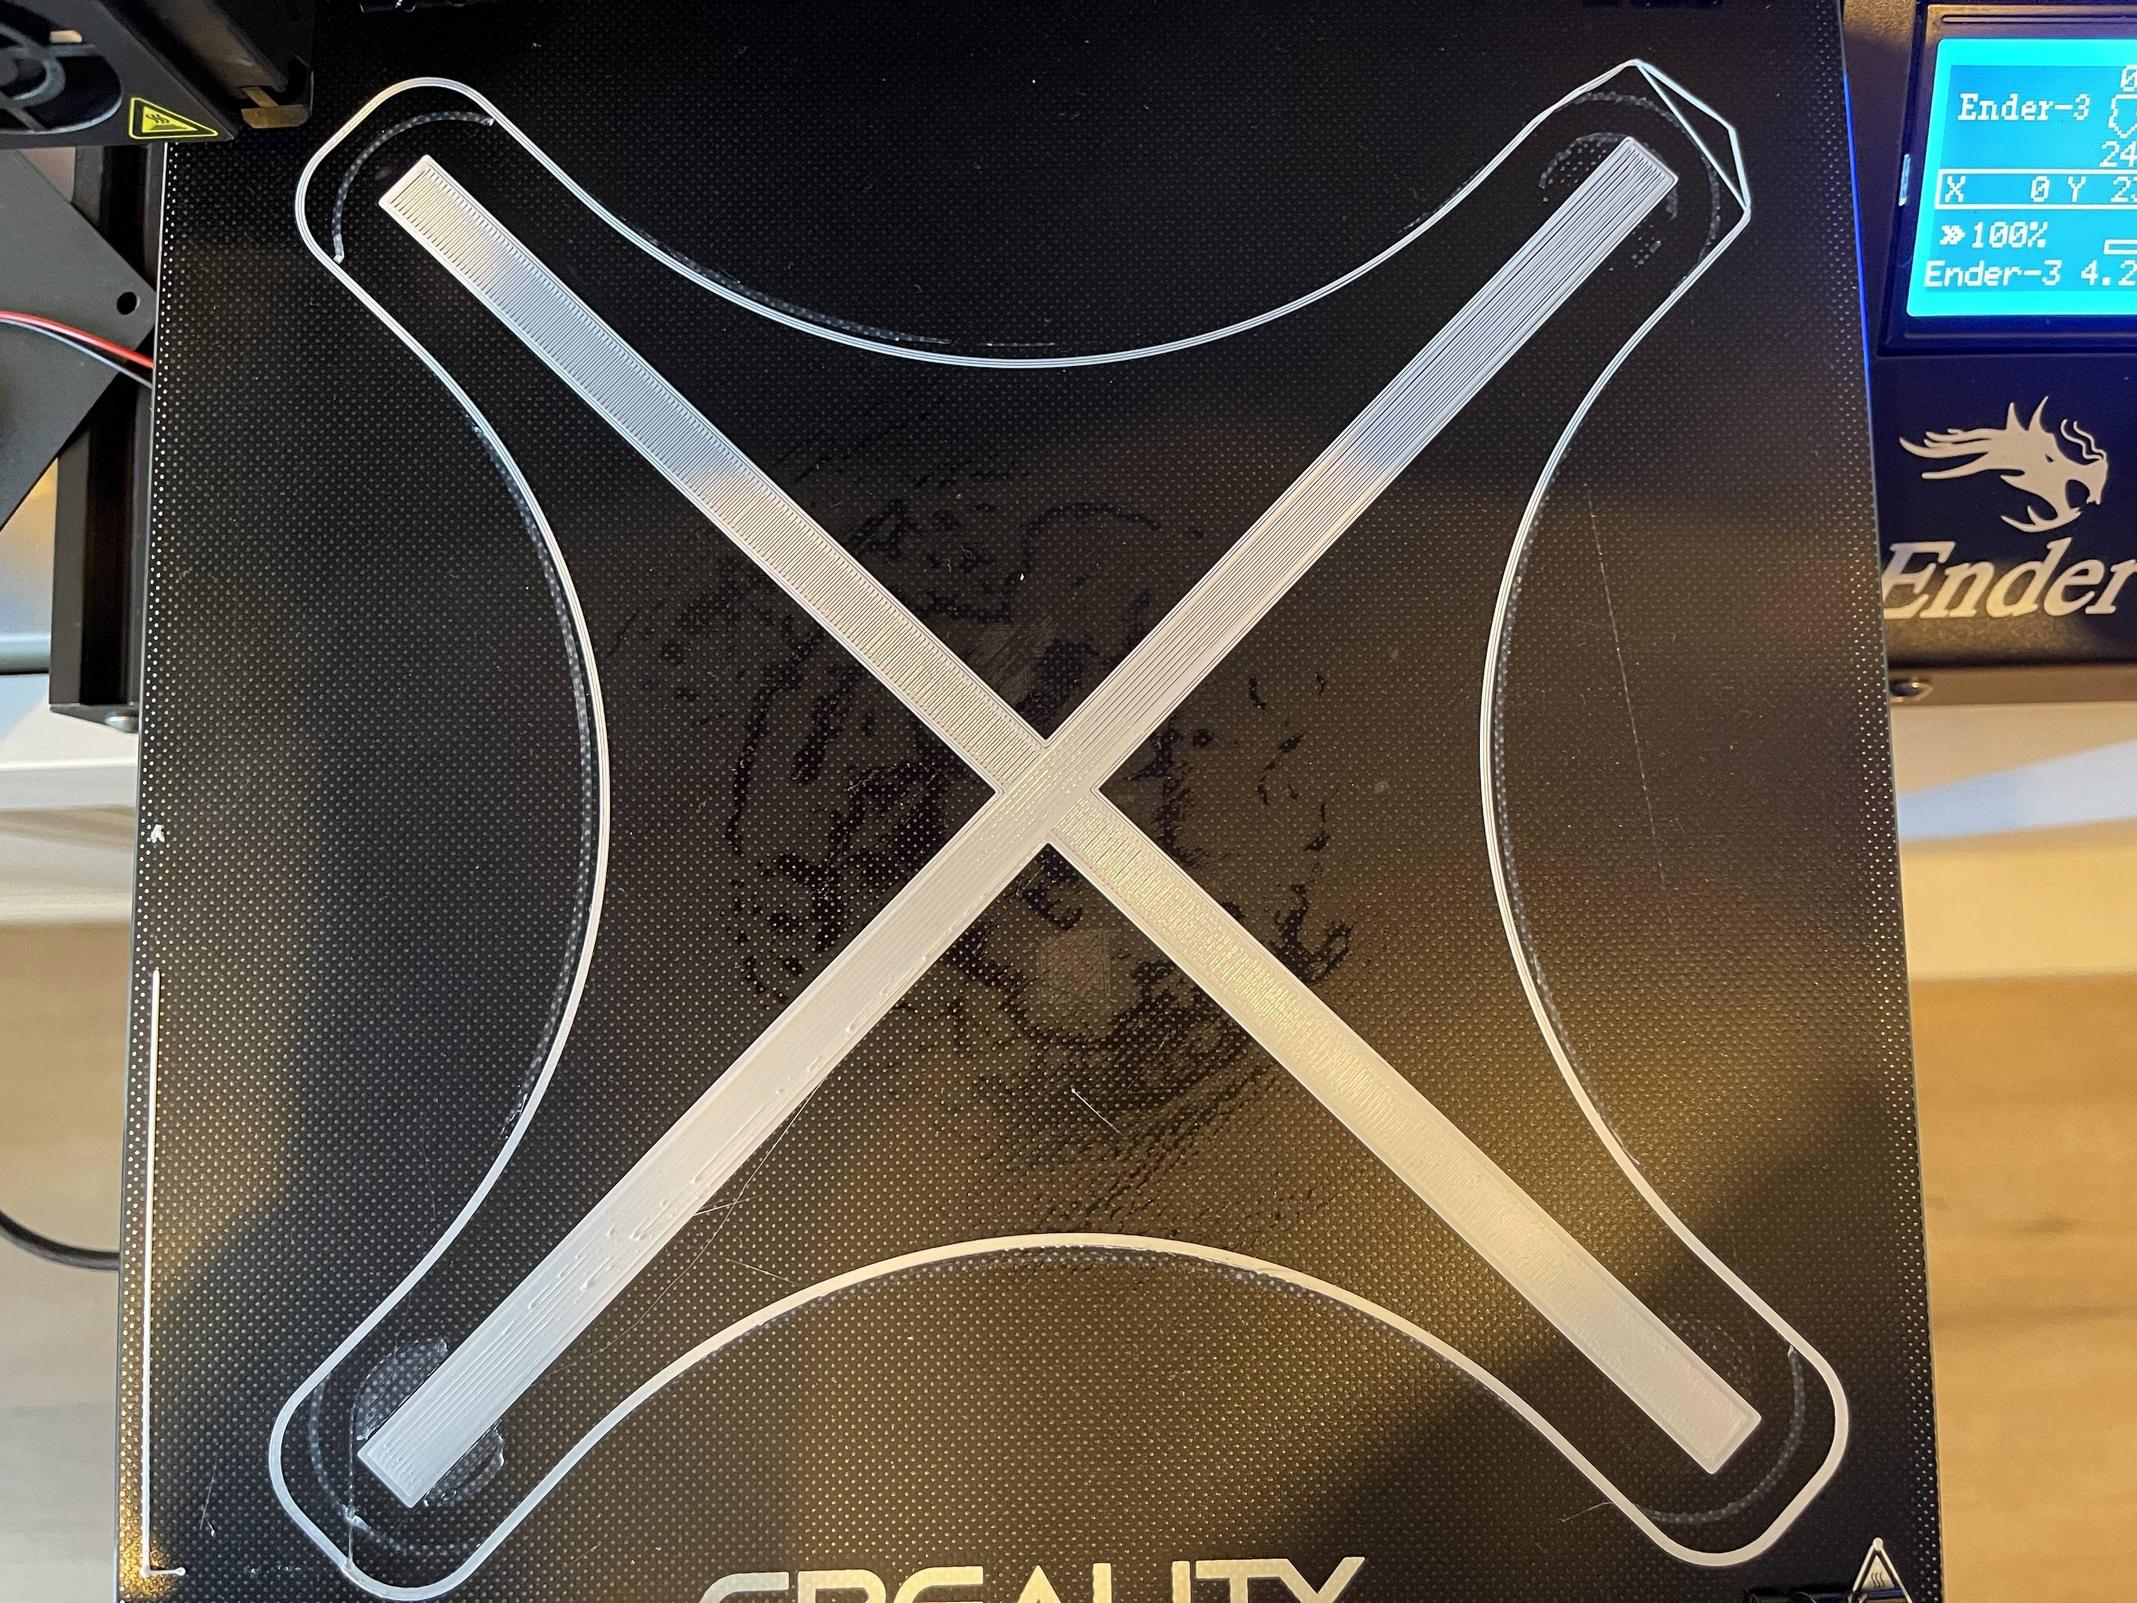
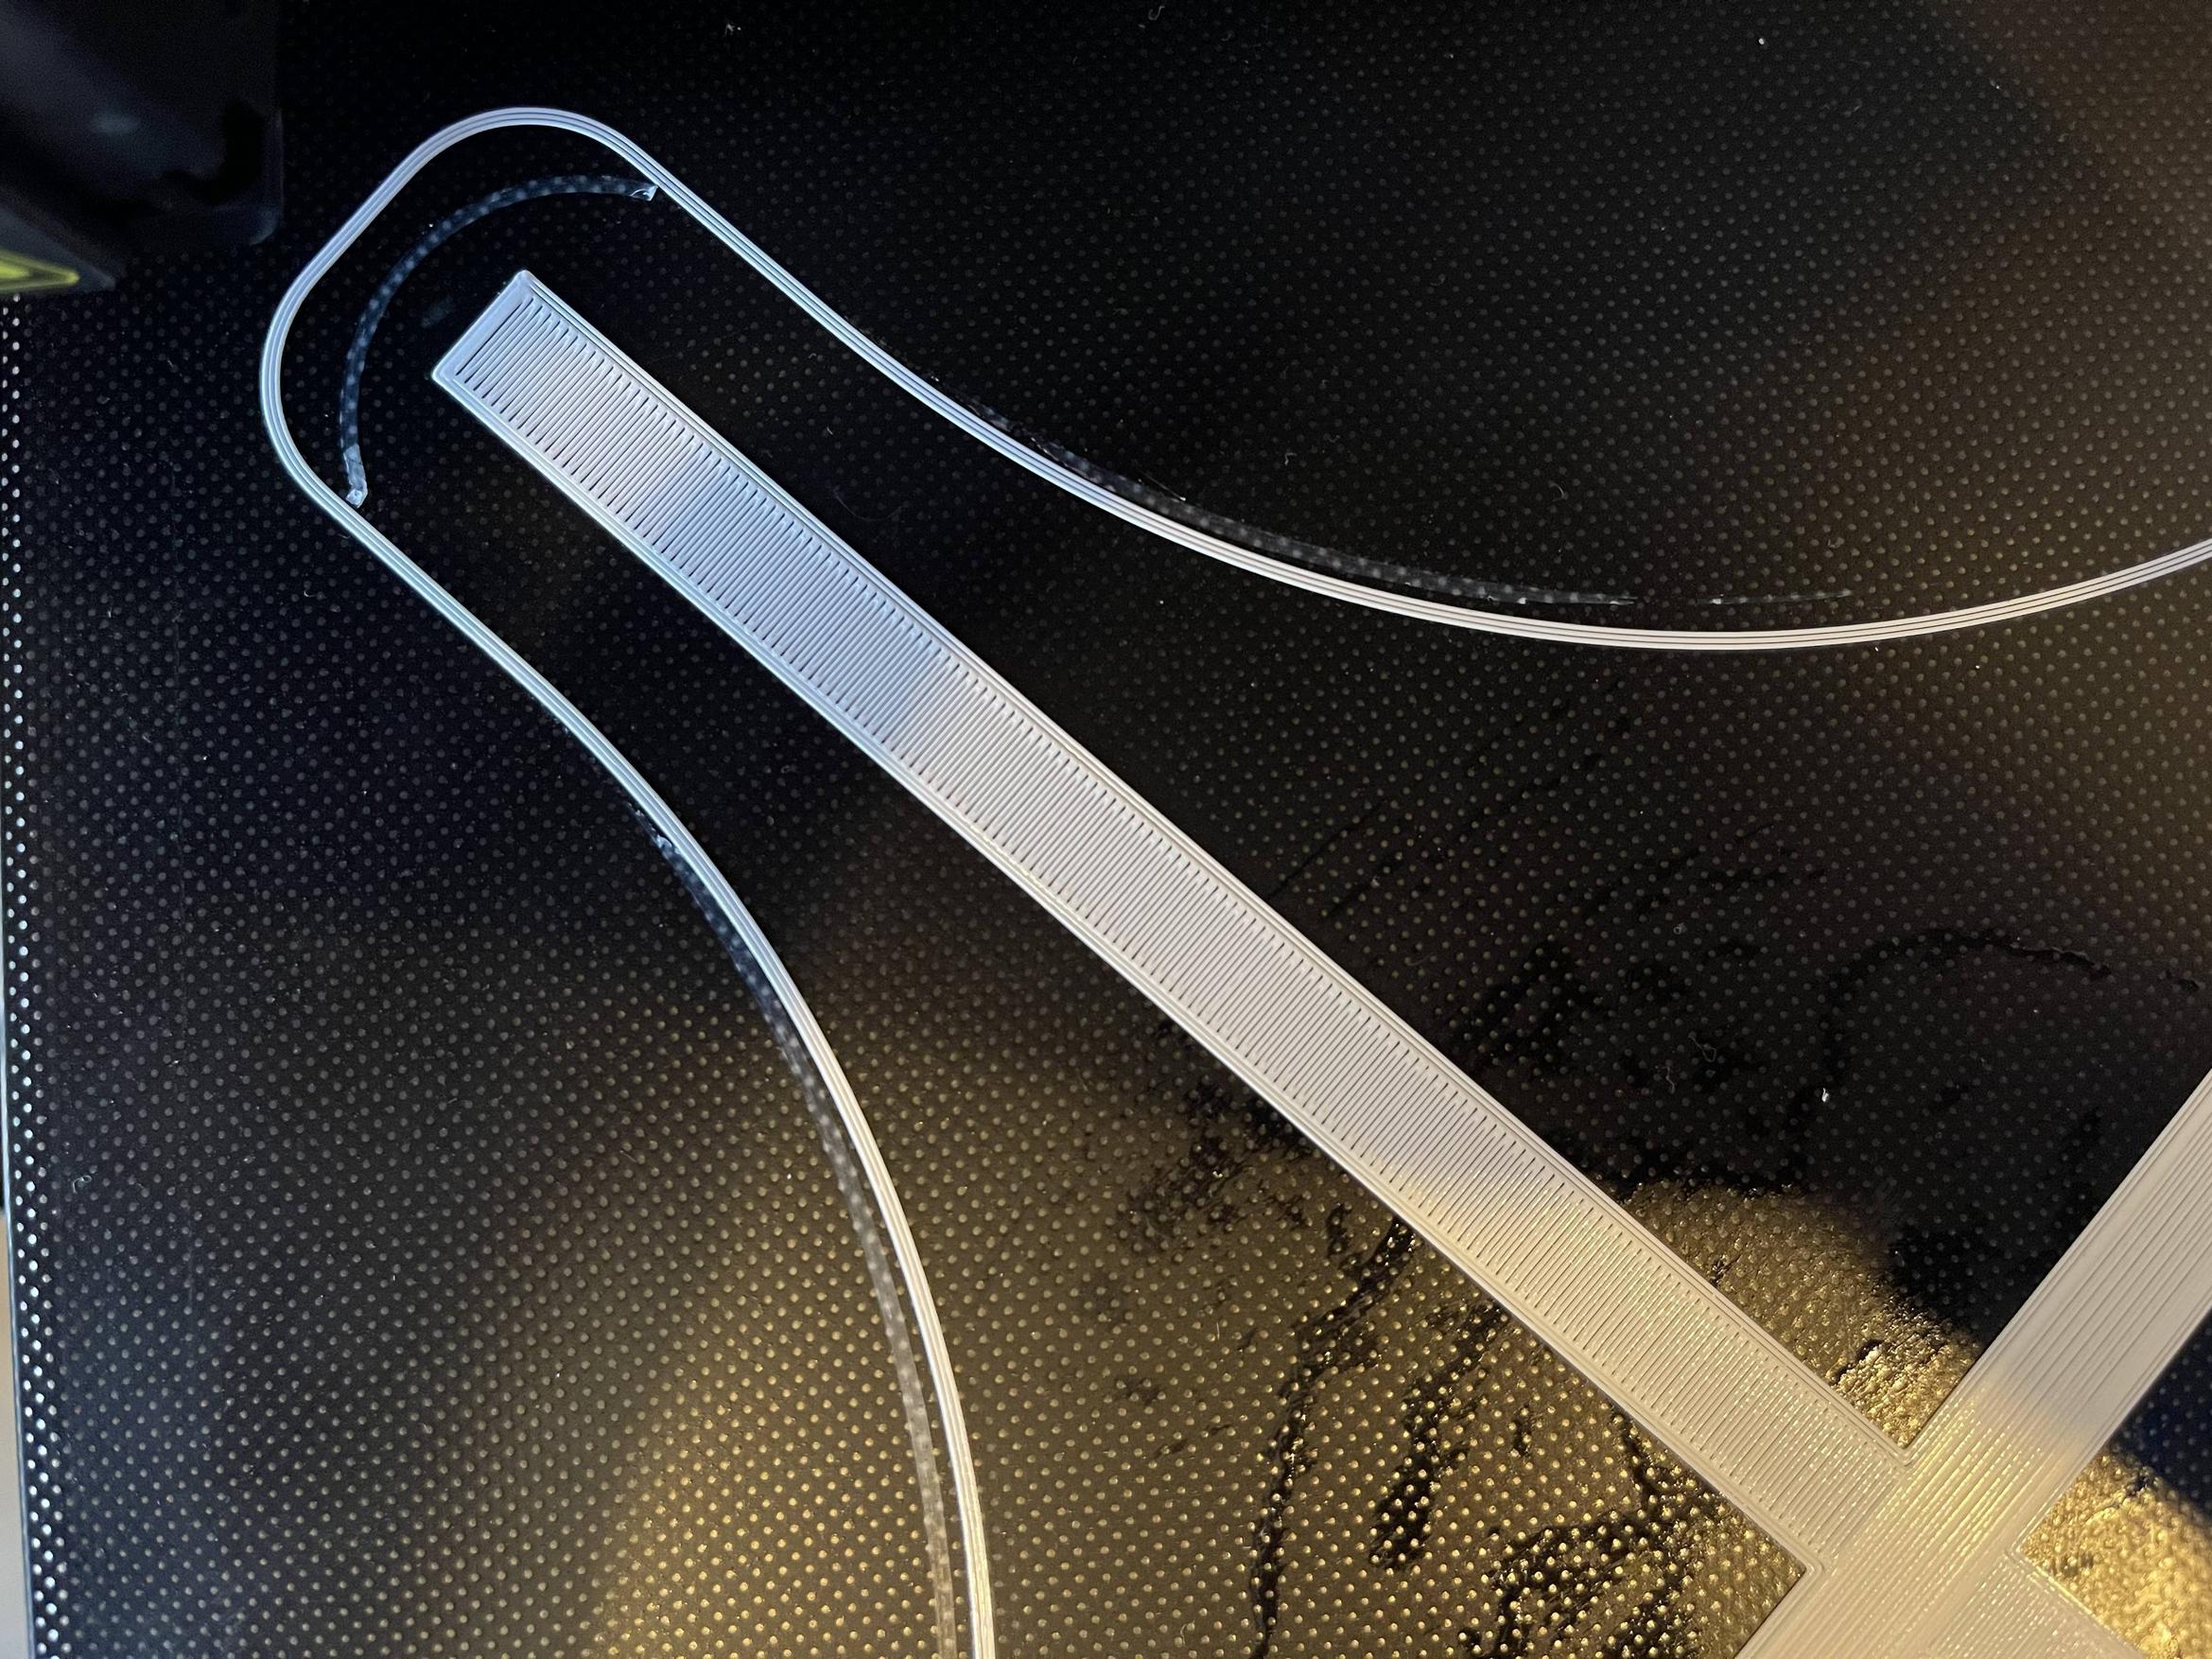
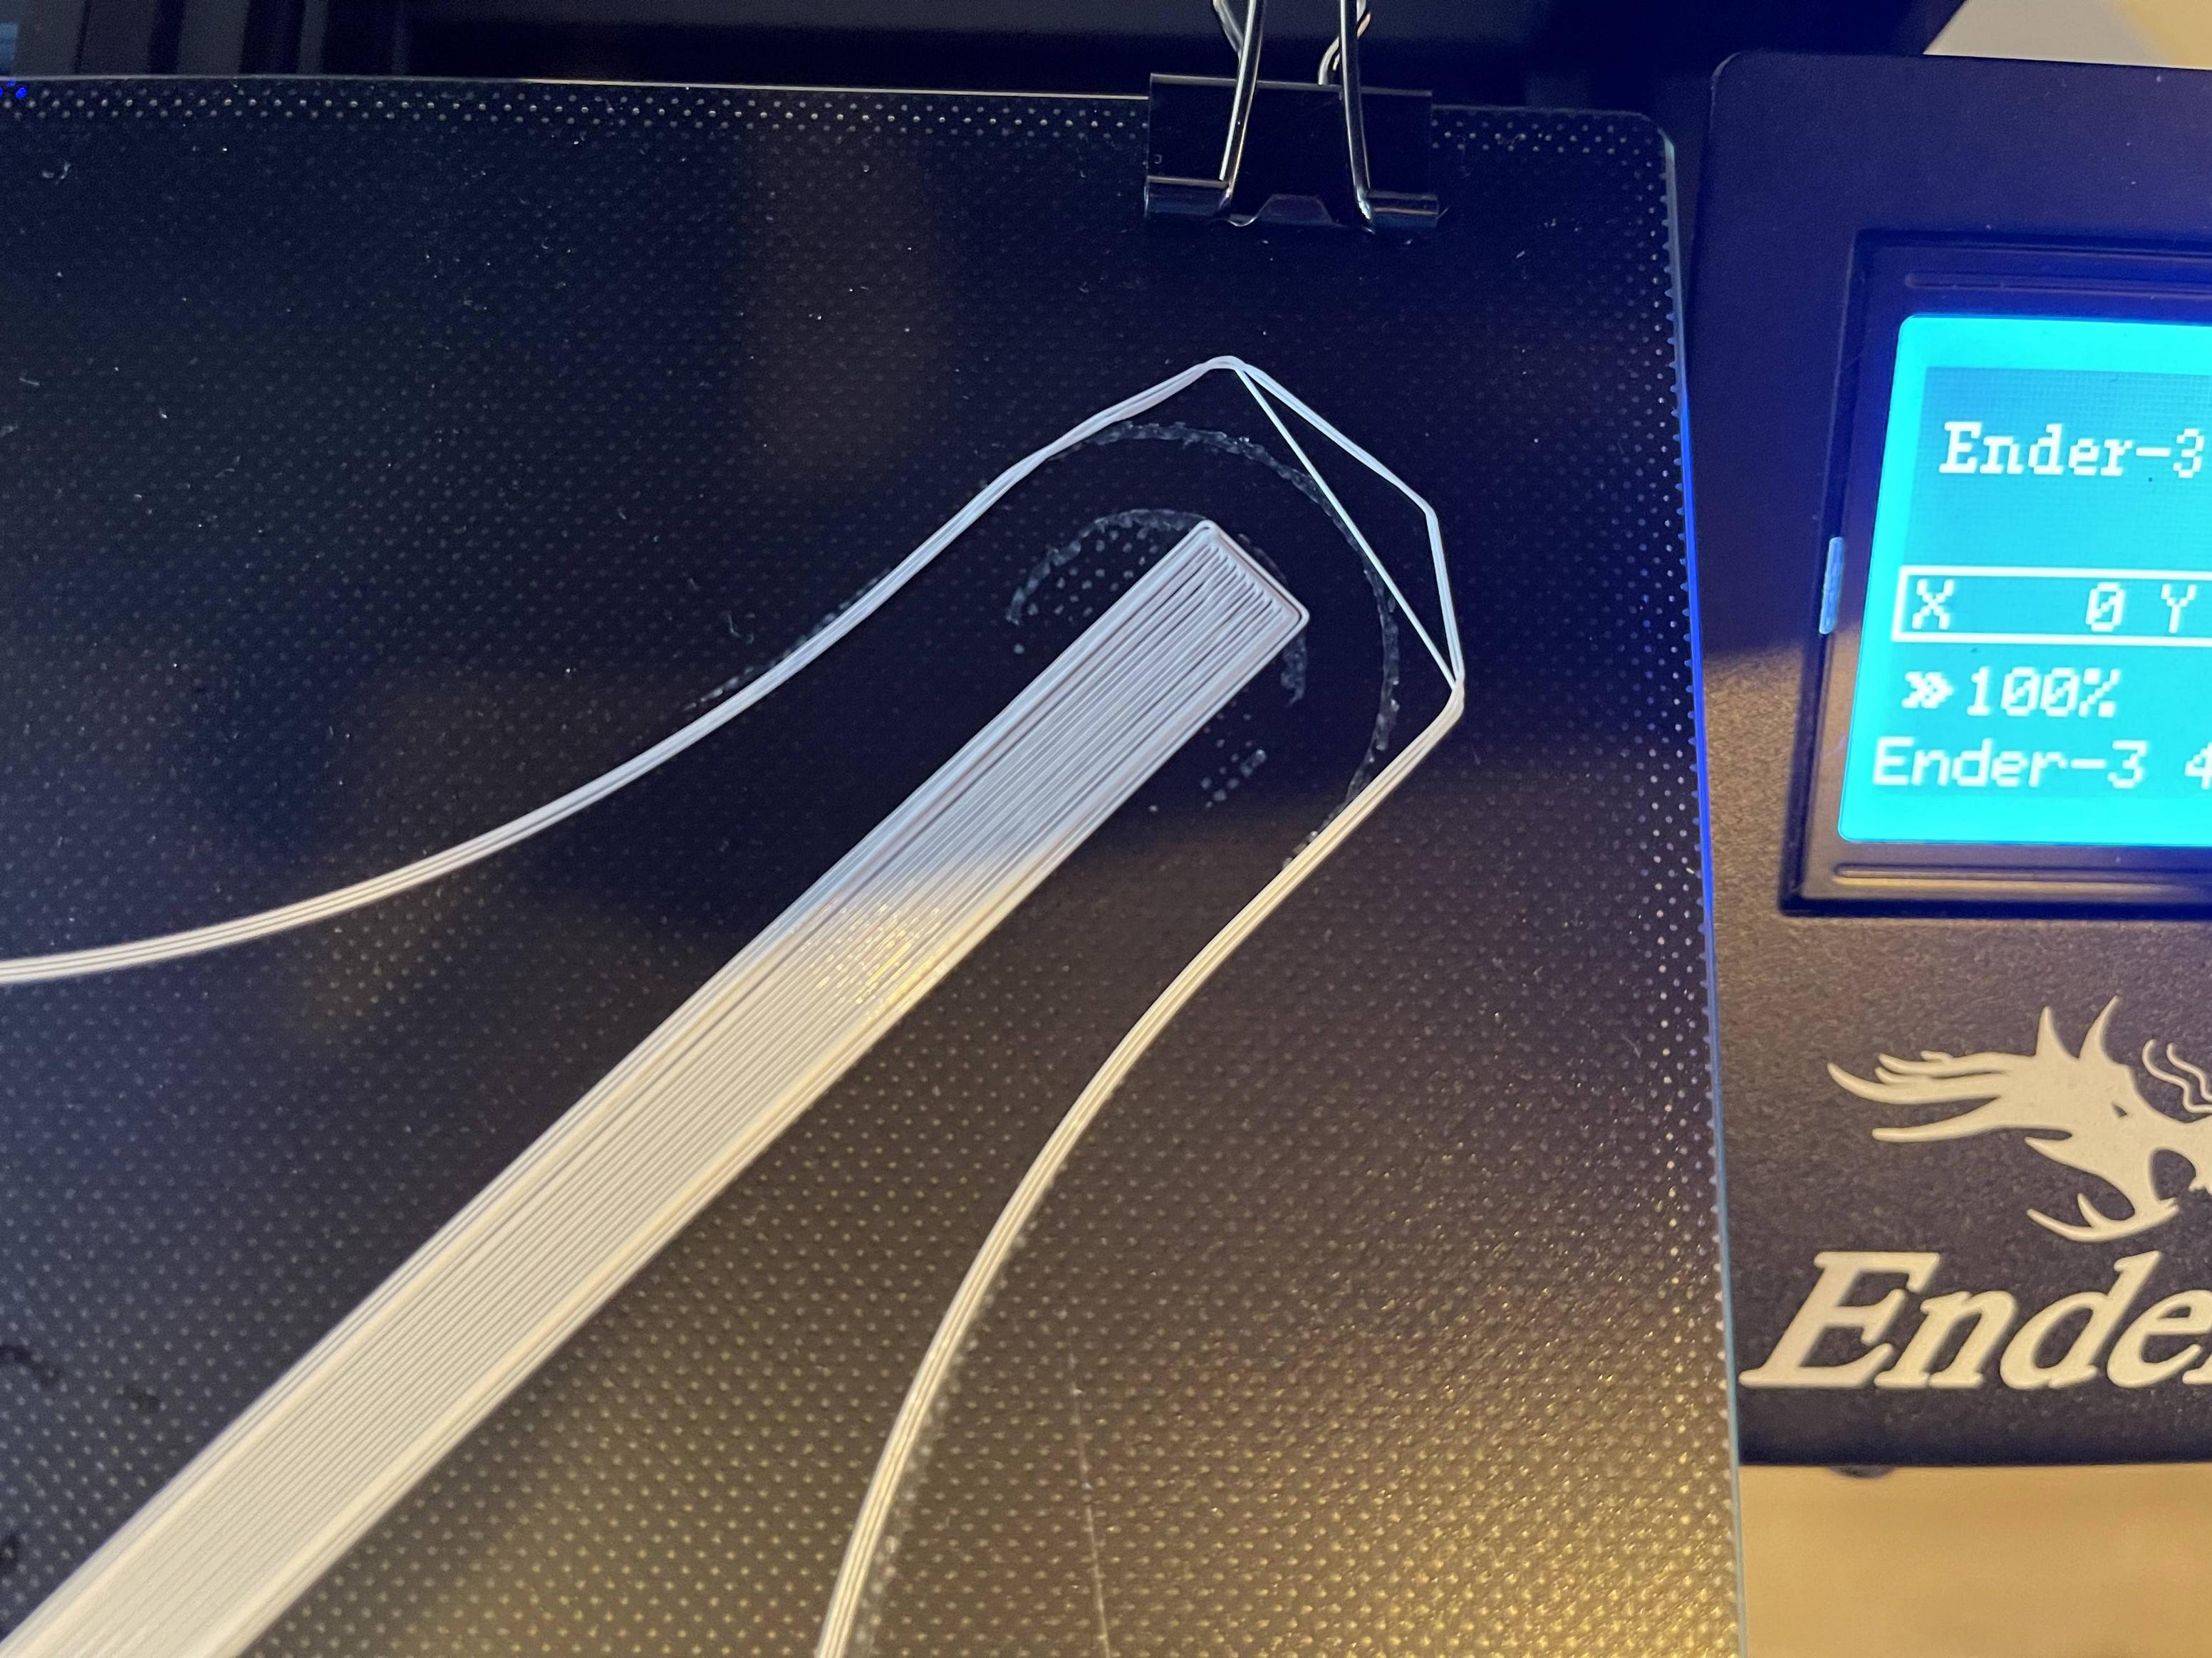
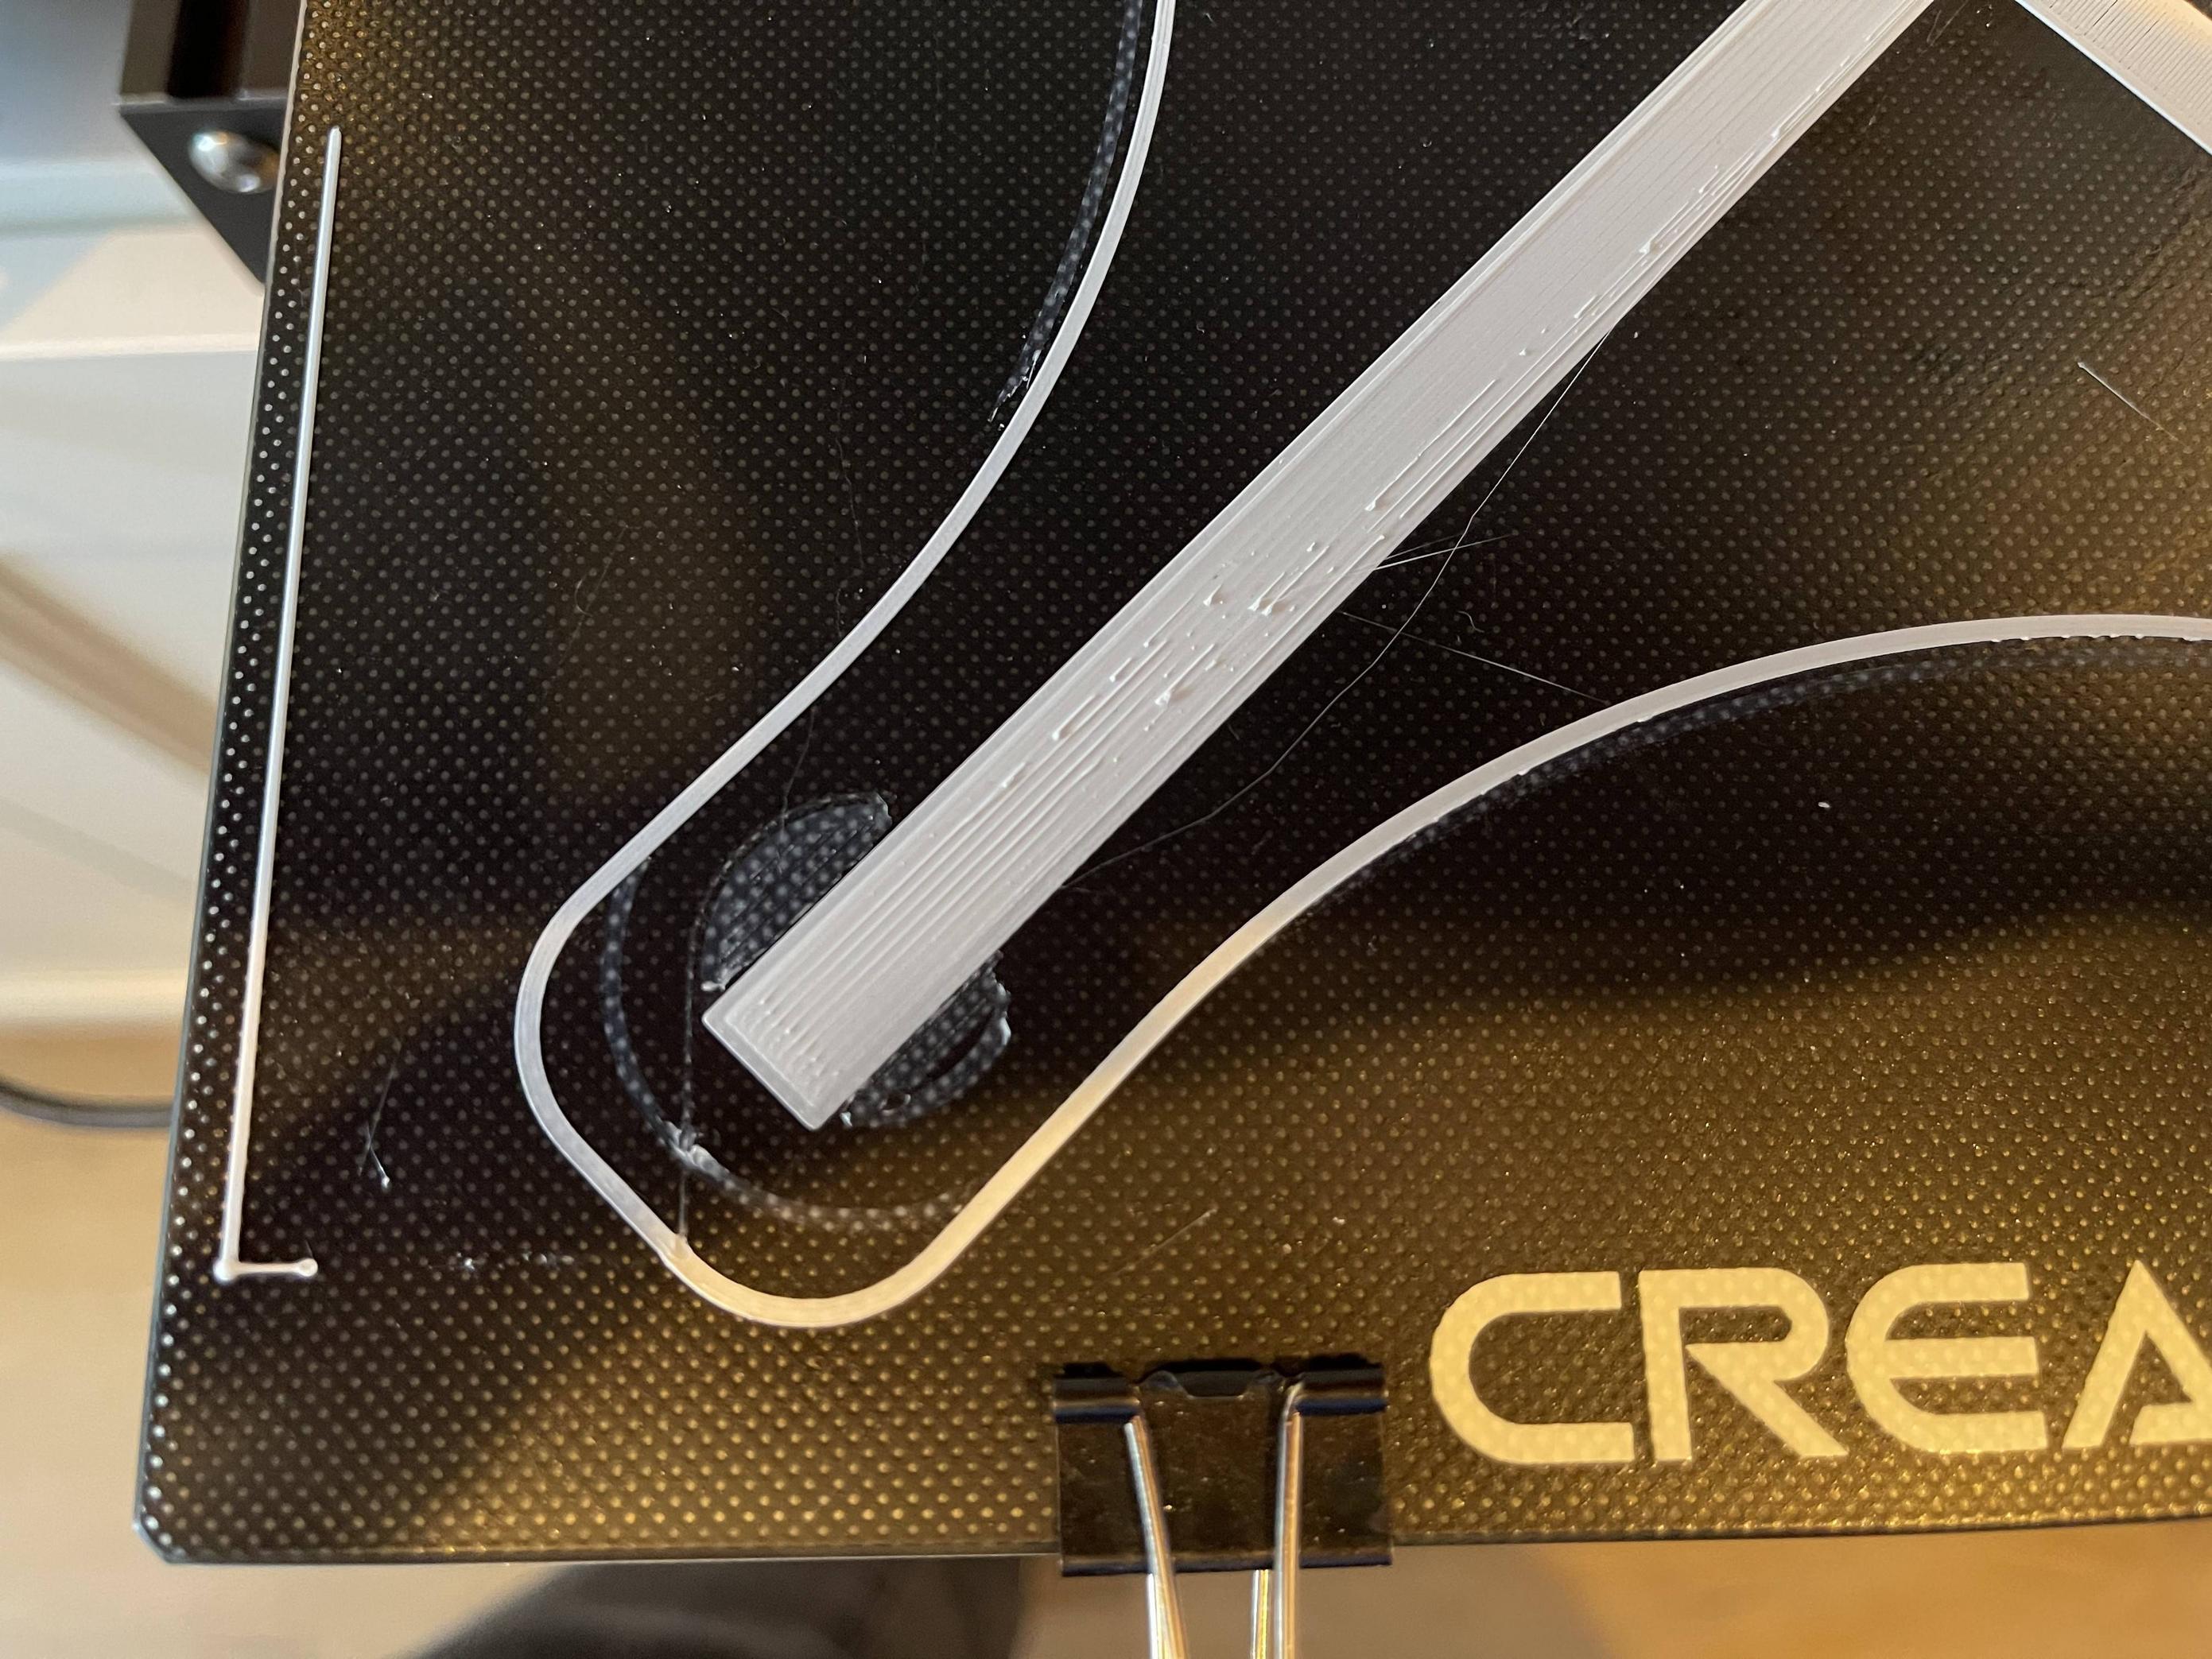
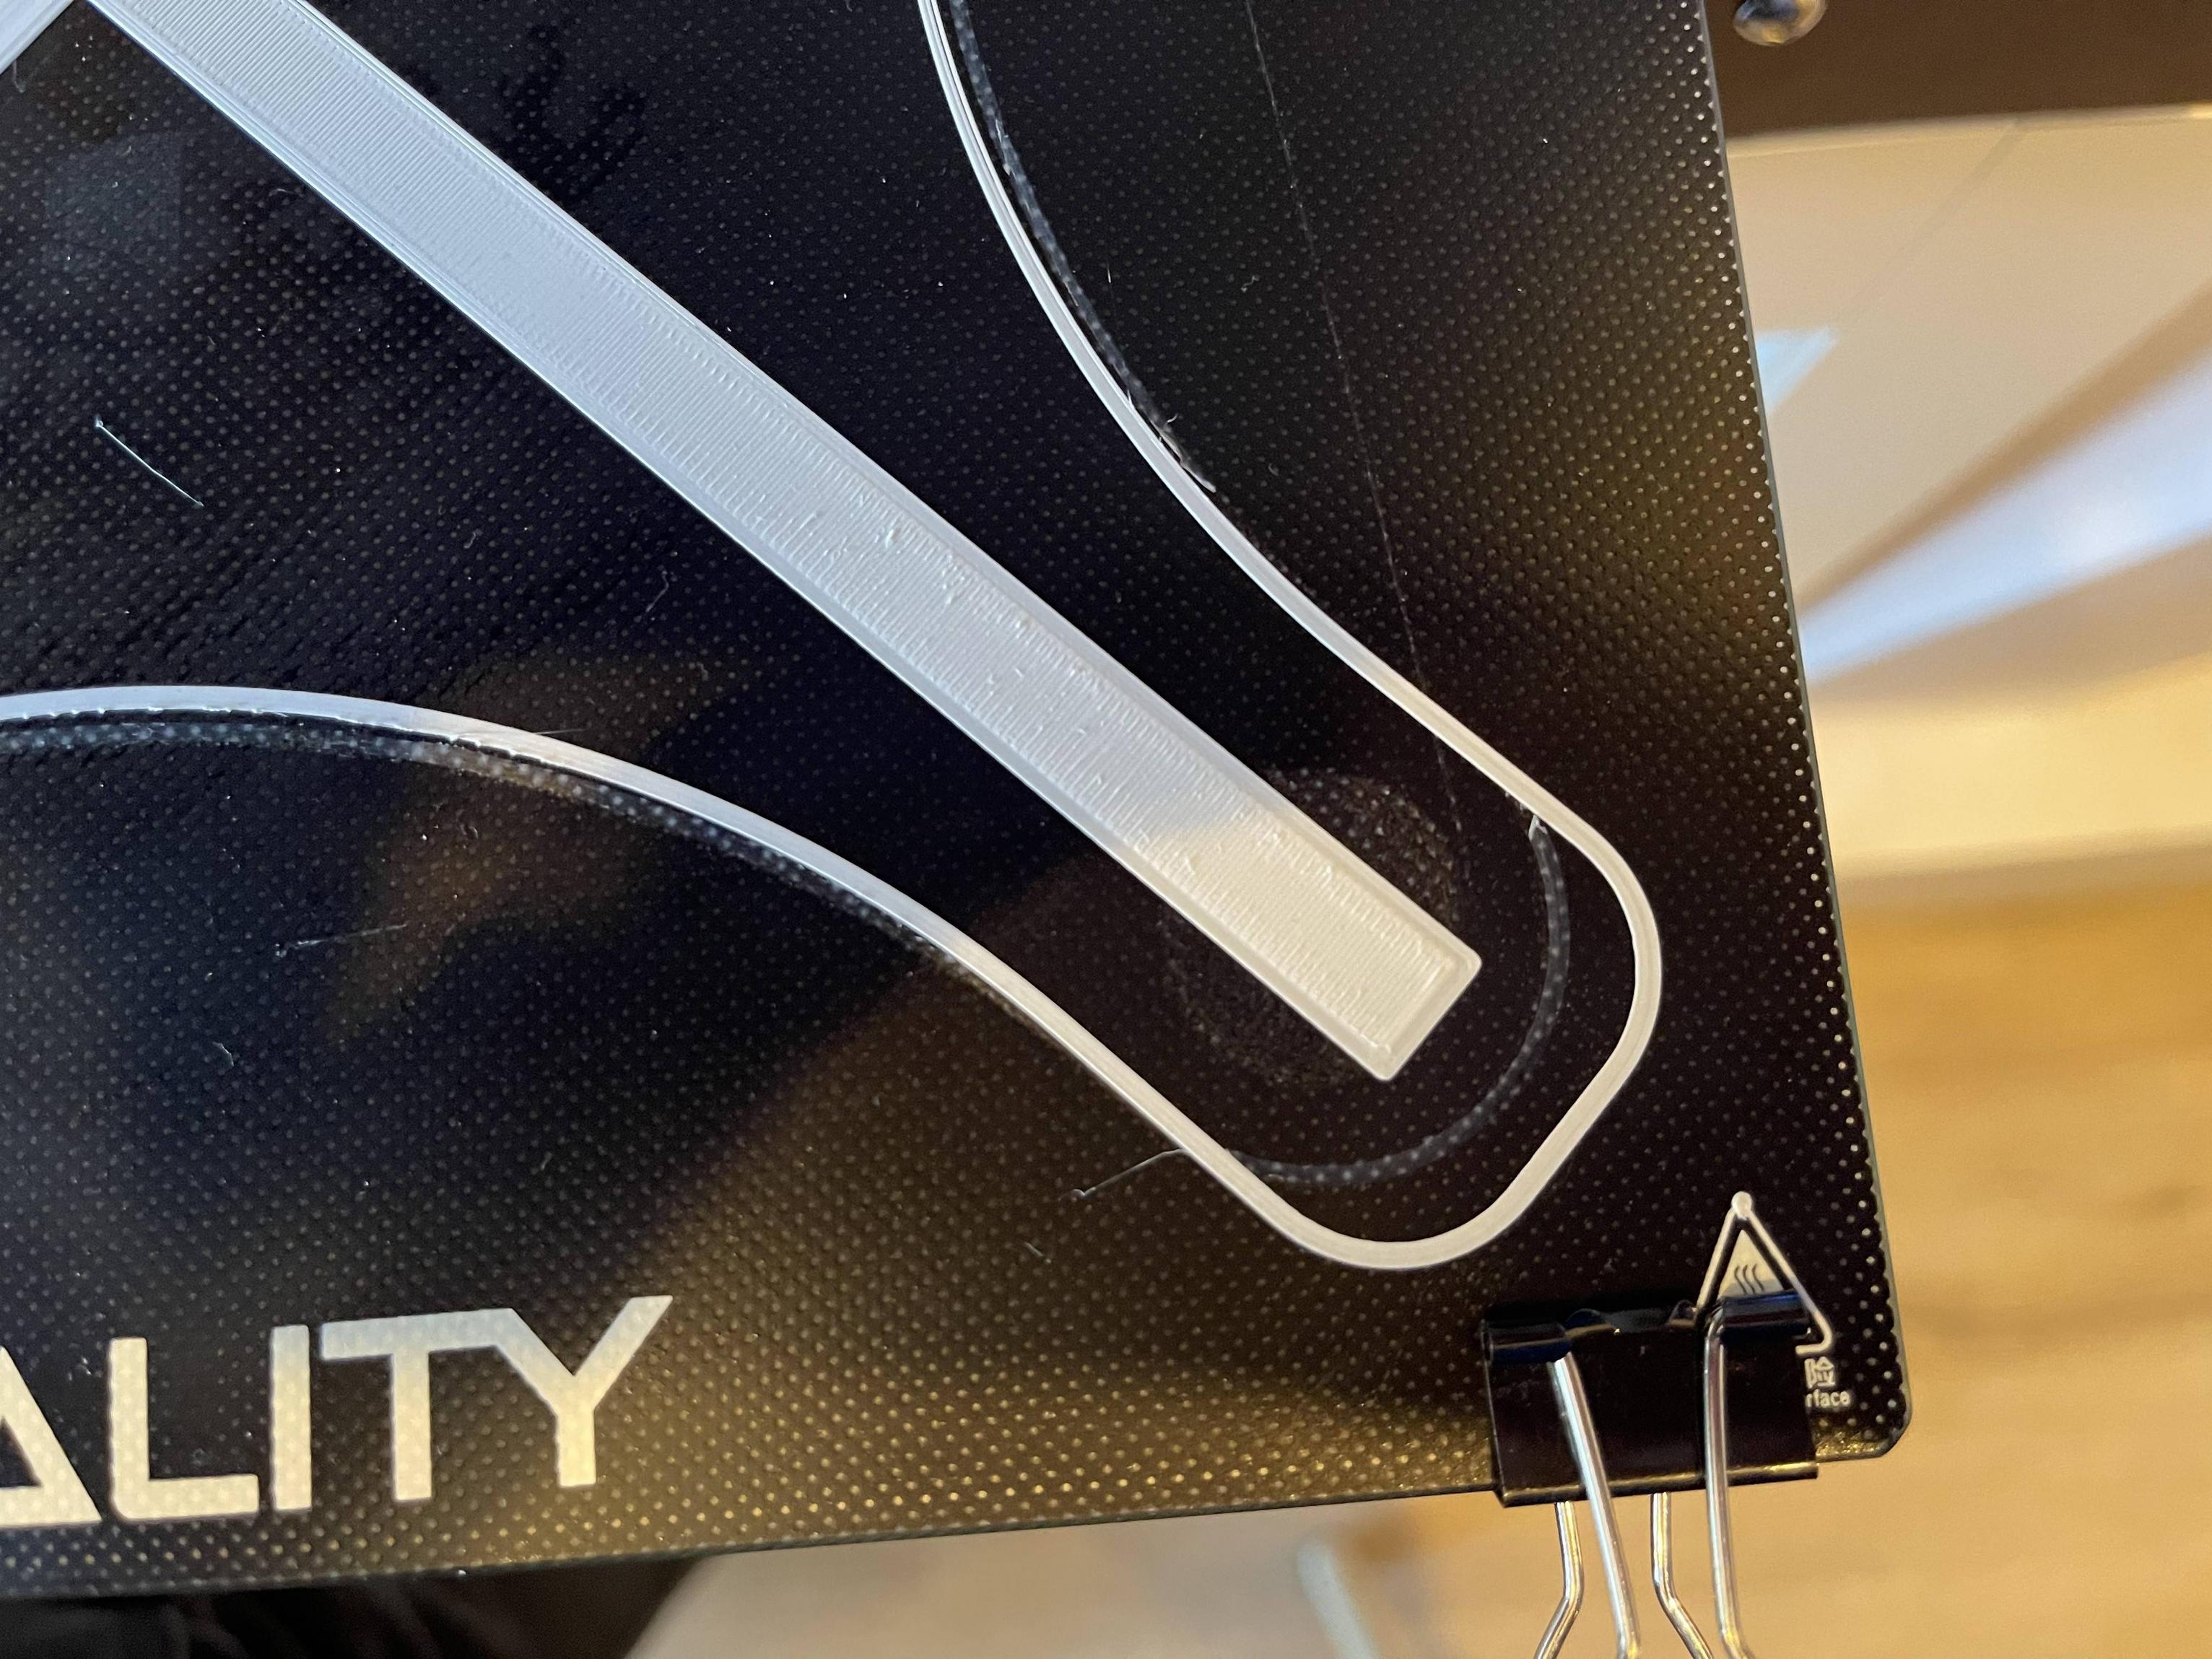
Despite starting with G28 & G29 in my G-code file, and the printer & BLTouch doing a proper bed levelling (the BLTouch seems to work as intended), the first layer comes out uneven. Please find some pictures below of a test print (this one). I hope the pictures show clearly that the nozzle is too close in the bottom left, and too far in the top right (top left is also a bit far, and bottom right a bit close).
I've done days of research, all over the web, Reddit, forums & YouTube and tried numerous fixes, to no avail
What I've done to try to fix / debug 1: Observe z compensation
When I do a test print with a bed levelling at the start, I observe the z-axis go up and down during the print, suggesting the printer is trying to compensate based on the readings from the start of the print. It just seems it's not compensating enough (or too much).
When I run a M420 V I get (which implies it has the mesh loaded):
Send: M420 V
Communication timeout while idle, trying to trigger response from printer. Configure long running commands or     increase communication timeout if that happens regularly on specific commands or long moves.
Recv: Bilinear Leveling Grid:
Recv:       0      1      2      3      4
Recv:  0 +1.245 +1.257 +1.282 +1.332 +1.342
Recv:  1 +1.187 +1.167 +1.130 +1.127 +1.147
Recv:  2 +1.082 +1.080 +1.057 +1.077 +1.085
Recv:  3 +1.202 +1.147 +1.057 +1.000 +0.957
Recv:  4 +1.192 +1.180 +1.117 +1.085 +1.027
Recv:
Recv: echo:Bed Leveling ON
Recv: echo:Fade Height 10.00
Recv: ok P15 B3
What I've done to try to fix / debug 2: Level the bed as much as possible
I've tried to level the bed as best as possible. As you can observe from the M420 V command the bed is pretty level. This was done using the Bed Level Visualizer plugin from OctoPrint.
What I've done to try to fix / debug 3: I've changed from a 3x3 grid to a 5x5 grid
As advised in several places the bed levelling is now done with a 5x5 grid. This didn't make a (noticeable) difference.
What I've done to try to fix / debug 4: I've updated the firmware
I used to run on the Creality firmware. I've downloaded new firmware from marlin.crc.id.au (did that today, so using Ender3-v4.2.7-BLTouch-20210511.bin). Didn't help.
What I've done to try to fix / debug 5: I've calibrated the Z-offset
I've done a lot of tests, tweaking the z value to the current value, where part of the bed comes too close to the nozzle, and part of the bed stays too far away. So the Z-offset is not going to be able to improve anything I believe.
What I've done to try to fix / debug 6: I've done all the regular hardware tweaks
I've checked all the common things: Belts are tight, wheels are properly tightened, nothing is wobbly, Z-axis is clean.
What I've done to try to fix / debug 7: I've tried to add M420 S
I've tried to add the M420 command after the G29 command (I know it shouldn't be needed, as G29 enables bed levelling, but just wanted to make sure)
Reference: My printer M503 settings
echo:  G21    ; Units in mm (mm)
echo:  M149 C ; Units in Celsius
echo:; Filament settings: Disabled
echo:  M200 S0 D1.75
echo:; Steps per unit:
echo: M92 X80.00 Y80.00 Z400.00 E93.00
echo:; Maximum feedrates (units/s):
echo:  M203 X500.00 Y500.00 Z20.00 E50.00
echo:; Maximum Acceleration (units/s2):
echo:  M201 X500.00 Y500.00 Z100.00 E5000.00
echo:; Acceleration (units/s2): P<print_accel> R<retract_accel> T<travel_accel>
echo:  M204 P500.00 R500.00 T500.00
echo:; Advanced: B<min_segment_time_us> S<min_feedrate> T<min_travel_feedrate> X<max_x_jerk> Y<max_y_jerk> Z<max_z_jerk> E<max_e_jerk>
echo:  M205 B20000.00 S0.00 T0.00 X10.00 Y10.00 Z0.30 E15.00
echo:; Home offset:
echo:  M206 X0.00 Y0.00 Z0.00
echo:; Auto Bed Leveling:
echo:  M420 S1 Z10.00
echo:  G29 W I0 J0 Z1.24499
echo:  G29 W I1 J0 Z1.25749
echo:  G29 W I2 J0 Z1.28249
echo:  G29 W I3 J0 Z1.33249
echo:  G29 W I4 J0 Z1.34249
echo:  G29 W I0 J1 Z1.18749
echo:  G29 W I1 J1 Z1.16749
echo:  G29 W I2 J1 Z1.12999
echo:  G29 W I3 J1 Z1.12749
echo:  G29 W I4 J1 Z1.14749
echo:  G29 W I0 J2 Z1.08249
echo:  G29 W I1 J2 Z1.07999
echo:  G29 W I2 J2 Z1.05749
echo:  G29 W I3 J2 Z1.07749
echo:  G29 W I4 J2 Z1.08499
echo:  G29 W I0 J3 Z1.20249
echo:  G29 W I1 J3 Z1.14749
echo:  G29 W I2 J3 Z1.05749
echo:  G29 W I3 J3 Z0.99999
echo:  G29 W I4 J3 Z0.95749
echo:  G29 W I0 J4 Z1.19249
echo:  G29 W I1 J4 Z1.17999
echo:  G29 W I2 J4 Z1.11749
echo:  G29 W I3 J4 Z1.08499
echo:  G29 W I4 J4 Z1.02749
echo:; Material heatup parameters:
echo:  M145 S0 H200.00 B60.00 F255
echo:  M145 S1 H240.00 B70.00 F255
echo:; PID settings:
echo:  M301 P21.73 I1.54 D76.55
echo:; Retract: S<length> F<units/m> Z<lift>
echo:  M207 S3.00 W13.00 F4800.00 Z0.30
echo:; Recover: S<length> F<units/m>
echo:  M208 S0.00 W0.00 F4800.00
echo:; Z-Probe Offset (mm):
echo:  M851 X-45.00 Y-7.00 Z-3.30
echo:; Filament load/unload lengths:
echo:  M603 L415.00 U450.00
echo:; Filament runout sensor:
echo:  M412 S0 D8.00
ok P15 B3
Reference: The start of my G-code file
;FLAVOR:Marlin
;TIME:775
;Filament used: 0.480677m
;Layer height: 0.2
;MINX:16.516
;MINY:16.515
;MINZ:0.2
;MAXX:218.485
;MAXY:218.485
;MAXZ:0.2
;Generated with Cura_SteamEngine 4.9.0
M140 S60
M105
M190 S60
M104 S215
M105
M109 S215
M82 ;absolute extrusion mode
; Ender 3 Custom Start G-code
G92 E0 ; Reset Extruder
G28 ; Home all axes
G29 ; Auto bed levelling
G1 Z2.0 F3000 ; Move Z Axis up little to prevent scratching of Heat Bed
G1 X0.1 Y20 Z0.3 F5000.0 ; Move to start position
G1 X0.1 Y200.0 Z0.3 F1500.0 E15 ; Draw the first line
G1 X0.4 Y200.0 Z0.3 F5000.0 ; Move to side a little
G1 X0.4 Y20 Z0.3 F1500.0 E30 ; Draw the second line
G92 E0 ; Reset Extruder
G1 Z2.0 F3000 ; Move Z Axis up little to prevent scratching of Heat Bed
G1 X5 Y20 Z0.3 F5000.0 ; Move over to prevent blob squish
G92 E0
G92 E0
G1 F2700 E-5
;LAYER_COUNT:1
;LAYER:0
M107
G0 F6000 X26.14 Y20.098 Z0.2
;TYPE:SKIRT
G1 F2700 E0
Reference: Congifuration.h
As I've used two precompiled firmwares (see point 4 above), I don't have a Congifuration.h to share.
Concluding
I hope I've given a detailed enough account for you guys to help me. If you have any additional questions I'll try to answer them as quickly as possible. Thanks a million!
