7
$\begingroup$

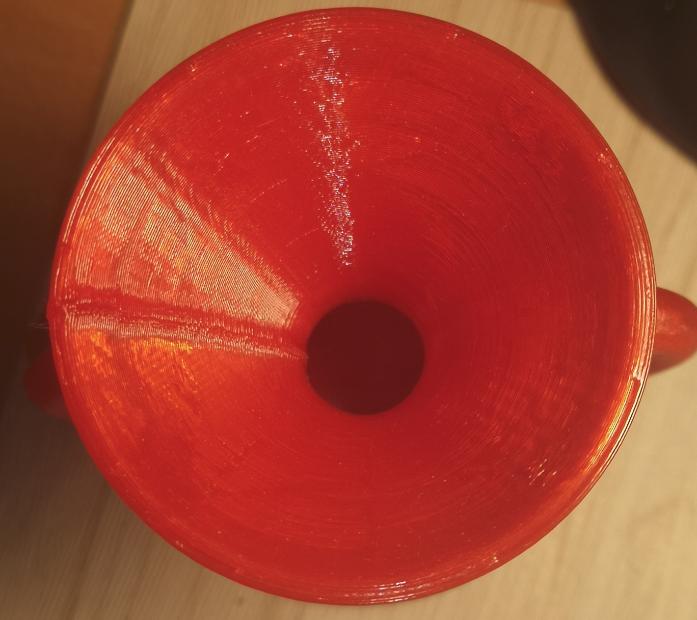
I printed this Curvy vase from Thingiverse and it came out pretty well on my Chiron.

Curvy vase print

However, I am not happy with the Z-seam that is very large. When I look at other people's problems with this, they often seem to have too little filament at the seam, but I have too much. What setting should I change to make it less visible?

  • Printer: Anycubic Chiron with Marlin 2.0.7
  • Material: PLA
  • Slicer: Cura 4.8.0.
  • Nozzle: 0.4 mm

All Cura settings are here (except that I lowered printing temperature to 200 ºC while printing).

All files used and some pictures are here.


2021-03-07 Addendum after I made 19 test-prints of a small portion of the vase's neck. Below are some of my notes:

  1. Combing Mode=All is better than Off
  2. Speed=60 is worse than 40
  3. Retract Before Outer Wall=On is worse than Off
  4. Outer Wall Line Width 0.45 to 0.35 gave a Z-seam on the outside with more build-up
  5. Inner Wall(s) Line Width 0.45 to 0.35. Some places has less contact between layers, so less appealing and less robust. Also less material use.
  6. Outer Wall Wipe Distance 2.0 spread ot the seam (too much), and also made a ditch before the Z-seam (on the outside of the ring).
  7. Coasting tripled to Vol=0.588 and Wipe Distance 5.0 is more appealing. Two changes at once make it impossible to know which one helped. 5 mm is not enough to completely wipe.
  8. 50% printing speed improved Z-seam and surface smoothness

In the future I will use slower speed for Outer Walls, test Wipe distance=2*Line Width, use Combing (turned Off because of some advice to do so when LIN_ADVANCE is used) and experiment with faster retractions and Z-movement. Pictures and complete notes are available here.
$\endgroup$
5
  • $\begingroup$ You might want to look into your retraction settings. Also look into the preview in Cura what happens at the seem, e.g. look for retraction and moves prior to the seem printing start. Note that overpressure in the nozzle can cause bulging out of filament at printing the end (up to) the seam. $\endgroup$
    – 0scar
    Commented Mar 1, 2021 at 22:32
  • $\begingroup$ Overpressure seems a reasonable explanation to me. I retract 6 mm at 40 mm/s and prime the same length at 30 mm/s. Slower priming because I read somewhere that too fast priming cause some problem, but I don't remember what. My Bowden tube is as short as possible and new. It moves ~1 mm when doing these retractions. And then there is a Z-hop happening. I guess the best thing would be if the nozzle left the "crime-scene" as soon as possible. Would it be better to skip retraction or Z-hop to save time? $\endgroup$
    – dotswe
    Commented Mar 1, 2021 at 23:40
  • 2
    $\begingroup$ For such a short Bowden tube, 6 mm might be a lot. Z-hop can also be disabled. Furthermore, PLA can be safely printed at higher speeds than e.g. PETG; you haven't mentioned the print speed. $\endgroup$
    – 0scar
    Commented Mar 2, 2021 at 9:25
  • $\begingroup$ Just a guess, but I would check to make sure retract on layer change isn't set, to make sure you don't have unnecessary retractions. $\endgroup$
    – Perry Webb
    Commented Mar 2, 2021 at 20:05
  • $\begingroup$ The Bowden tube is as short as possible, but the Chiron printer is large, so the length is ~500mm. Retract on layer change is not set. Print speed was 55 mm/s. The place where the bulge is, is not the first nor last thing that is printer on each layer. I will test different retractions and disabling Z-hop in a day or max 2. $\endgroup$
    – dotswe
    Commented Mar 3, 2021 at 4:07

4 Answers 4

3
$\begingroup$

A bulging seam is caused by a mix of factors, especially:

  1. Material oozing while dwelling too long at the point of layer change (including the time spent in the Z move). This can be mitigated by ramping up the max Z speed and acceleration and/or enabling retract at layer change with a very fast retract and unretract speed (without doing it very fast, the time spent retracting has the same effect as the time spent on Z move).

  2. Excess extrusion due to pressure remaining at the nozzle when decelerating. This can be mitigated by enabling Linear Advance and tuning the K factor for your printer's bowden tube and material properties. A value around 0.5 is probably needed for PLA on your printer. Increasing your acceleration limit to reduce the time spent accelerating/decelerating can also go a long way to mitigate this.

$\endgroup$
3
  • $\begingroup$ Ozing is the problem, as 0scar also has written. $\endgroup$
    – dotswe
    Commented Mar 7, 2021 at 6:37
  • $\begingroup$ Regarding time spent on Z move; Cura has a normally hidden setting called "Z Hop Speed" that was set at 10 mm/s. I raised it to 30, and hopefully it will do good. $\endgroup$
    – dotswe
    Commented Mar 9, 2021 at 22:26
  • $\begingroup$ @dotswe: This isn't a Z-hop. Z-hop is an optional temporary Z move done together with retraction before travel. It makes oozing/stringing worse but mitigates colliding with the previous layer when you have warping or overextrusion problems. The relevant thing here is just the normal Z movement speed. $\endgroup$ Commented Mar 10, 2021 at 1:22
6
$\begingroup$

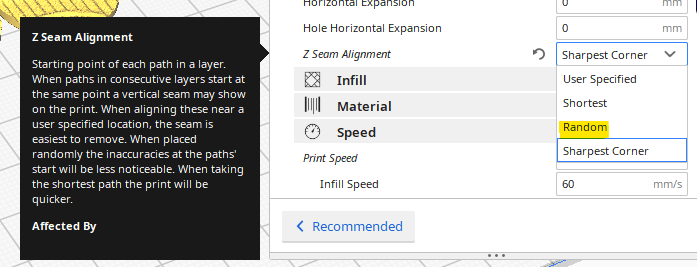
There is a Cura option to choose a random seam alignment in the shell menu:

enter image description here

Z-seam alignment

This setting allows you to choose where each new layer in the Z direction starts and affects where the seam of the model will be. This is useful for models with consecutive equal layers as the seam can be visible. By changing the Z-seam alignment you can decrease the visibility of the seam. The options available are:

  • User-specified: Set a coordinate for the X and Y direction of the Z-seam. This coordinate is absolute by default. Example: X 100, Y 200 will move the seam to the center back of the model.
  • Shortest: The next layer starts at the endpoint of the previous layer. This is the fastest way of printing, but also creates the most visible seam.
  • Random: The next layer starts at a random point of the previous layer, which eliminates the chance of a seam. Print time will increase due to the necessary travel moves.
  • Sharpest corner: This puts the seam in the sharpest inward or outward corner of the model, when available. This is the best method to completely hide the seam.
$\endgroup$
2
  • $\begingroup$ Indeed, but unless the over-pressure is not fixed it will give you bulges at many positions. $\endgroup$
    – 0scar
    Commented Mar 2, 2021 at 12:48
  • $\begingroup$ @0scar true, but it dissipates the error on a larger area, making it appear more uniform. $\endgroup$
    – Trish
    Commented Mar 2, 2021 at 13:59
4
$\begingroup$

This Cura support page lists the options for Shell settings, specifically:

Seam corner preference

The Z-seam is hidden as much as possible by default. However, for some projects, specifically those that require post-processing, exposing the seam can be necessary for the post-print processing. To do so, you can adjust the following settings:

  • None: The seam will remain on the Z-seam alignment location.
  • Hide seam: The seam will be hidden as much as possible.
  • Expose seam: The seam will be exposed as much as possible.
  • Hide or expose: The seam will be hidden when possible and exposed when there is no other option.

In your setting, you have "None". You may need to set it to "Hide seam".

$\endgroup$
1
  • 1
    $\begingroup$ I have tried many settings for this one and I believe that it will not make any difference since the object is round. I don't want to print the object again, so I just sliced it using both settings and compared the images (of layer 326) in GIMP using "Difference", and all I could see is a slight change of where the seam is placed. Everything else was black. There must be a better way to compare two G-code files. $\endgroup$
    – dotswe
    Commented Mar 1, 2021 at 23:21
2
$\begingroup$

Use Cura's "Vase Mode" (known as Spiralize Outer Contour) for seamless printing.

$\endgroup$
5
  • 1
    $\begingroup$ Welcome and thank you for your contribution. Could you elaborate a little bit more on how "Vase Mode" would help this situation. Also, when you get a chance, please take the Tour to understand how the site works and how it is different than others. $\endgroup$
    – agarza
    Commented Mar 3, 2021 at 4:11
  • $\begingroup$ That is not optimal, it would get rid of the seem, but with a small nozzle you will get a single wall vase, this might work better when the nozzle is replaced for a larger nozzle. $\endgroup$
    – 0scar
    Commented Mar 3, 2021 at 9:41
  • $\begingroup$ I've worked with a few slicer software. They all have a "Vase Mode", which does a continuous spiral print pattern. This allows the filament to overlap where the seam would be. I would experiment with this before I'd try to replace the printer nozzle, which would cause you to have to recalibrate extrusion flow and layer height and probably print speed $\endgroup$
    – markcosmic
    Commented Mar 3, 2021 at 17:09
  • $\begingroup$ Hi, welcome to 3DPrinting.SE! The answer is a little short. In Cura, the vase option is known as Spiralize Outer Contour, this is valuable information as you cannot find it in the options under "vase". I've rolled back the edit that contains this information. Note that SE sites work different than normal forums. Good that you commented on my comment, but you should edit that into the answer, comments can and will sometimes be deleted. $\endgroup$
    – 0scar
    Commented Mar 3, 2021 at 21:56
  • 3
    $\begingroup$ Vase mode or spiralized contour does not work for all designs and they are incredibly weak in comparison to massive several shell prints. $\endgroup$
    – Trish
    Commented Mar 3, 2021 at 22:28

You must log in to answer this question.

Not the answer you're looking for? Browse other questions tagged .