7
$\begingroup$

I started using rafts more often, to get better results with complex or fragile parts, but my Ender 3 consistently under-extrudes the initial outside line of the raft (for the first inch or two, where extrusion starts).

It is often very thin and does not adhere. This often leads to problems with the following pattern of raft layer 1 curling up (ABS) as it does not meet the edge line (due to the 1-2 inch gap in the perimeter).

Skirts avoid this problem by getting the flow going, but rafts only print a single outer line.

  1. Is it possible to specify more than one outer line on a raft in Ultimaker Cura?
  2. Is it possible to add a skirt to a print that has a raft (or at least some initial printing to get the flow going)?
  3. Is it possible to add some initial G-code that will extrude a line, say from near the start position to the start of the print?
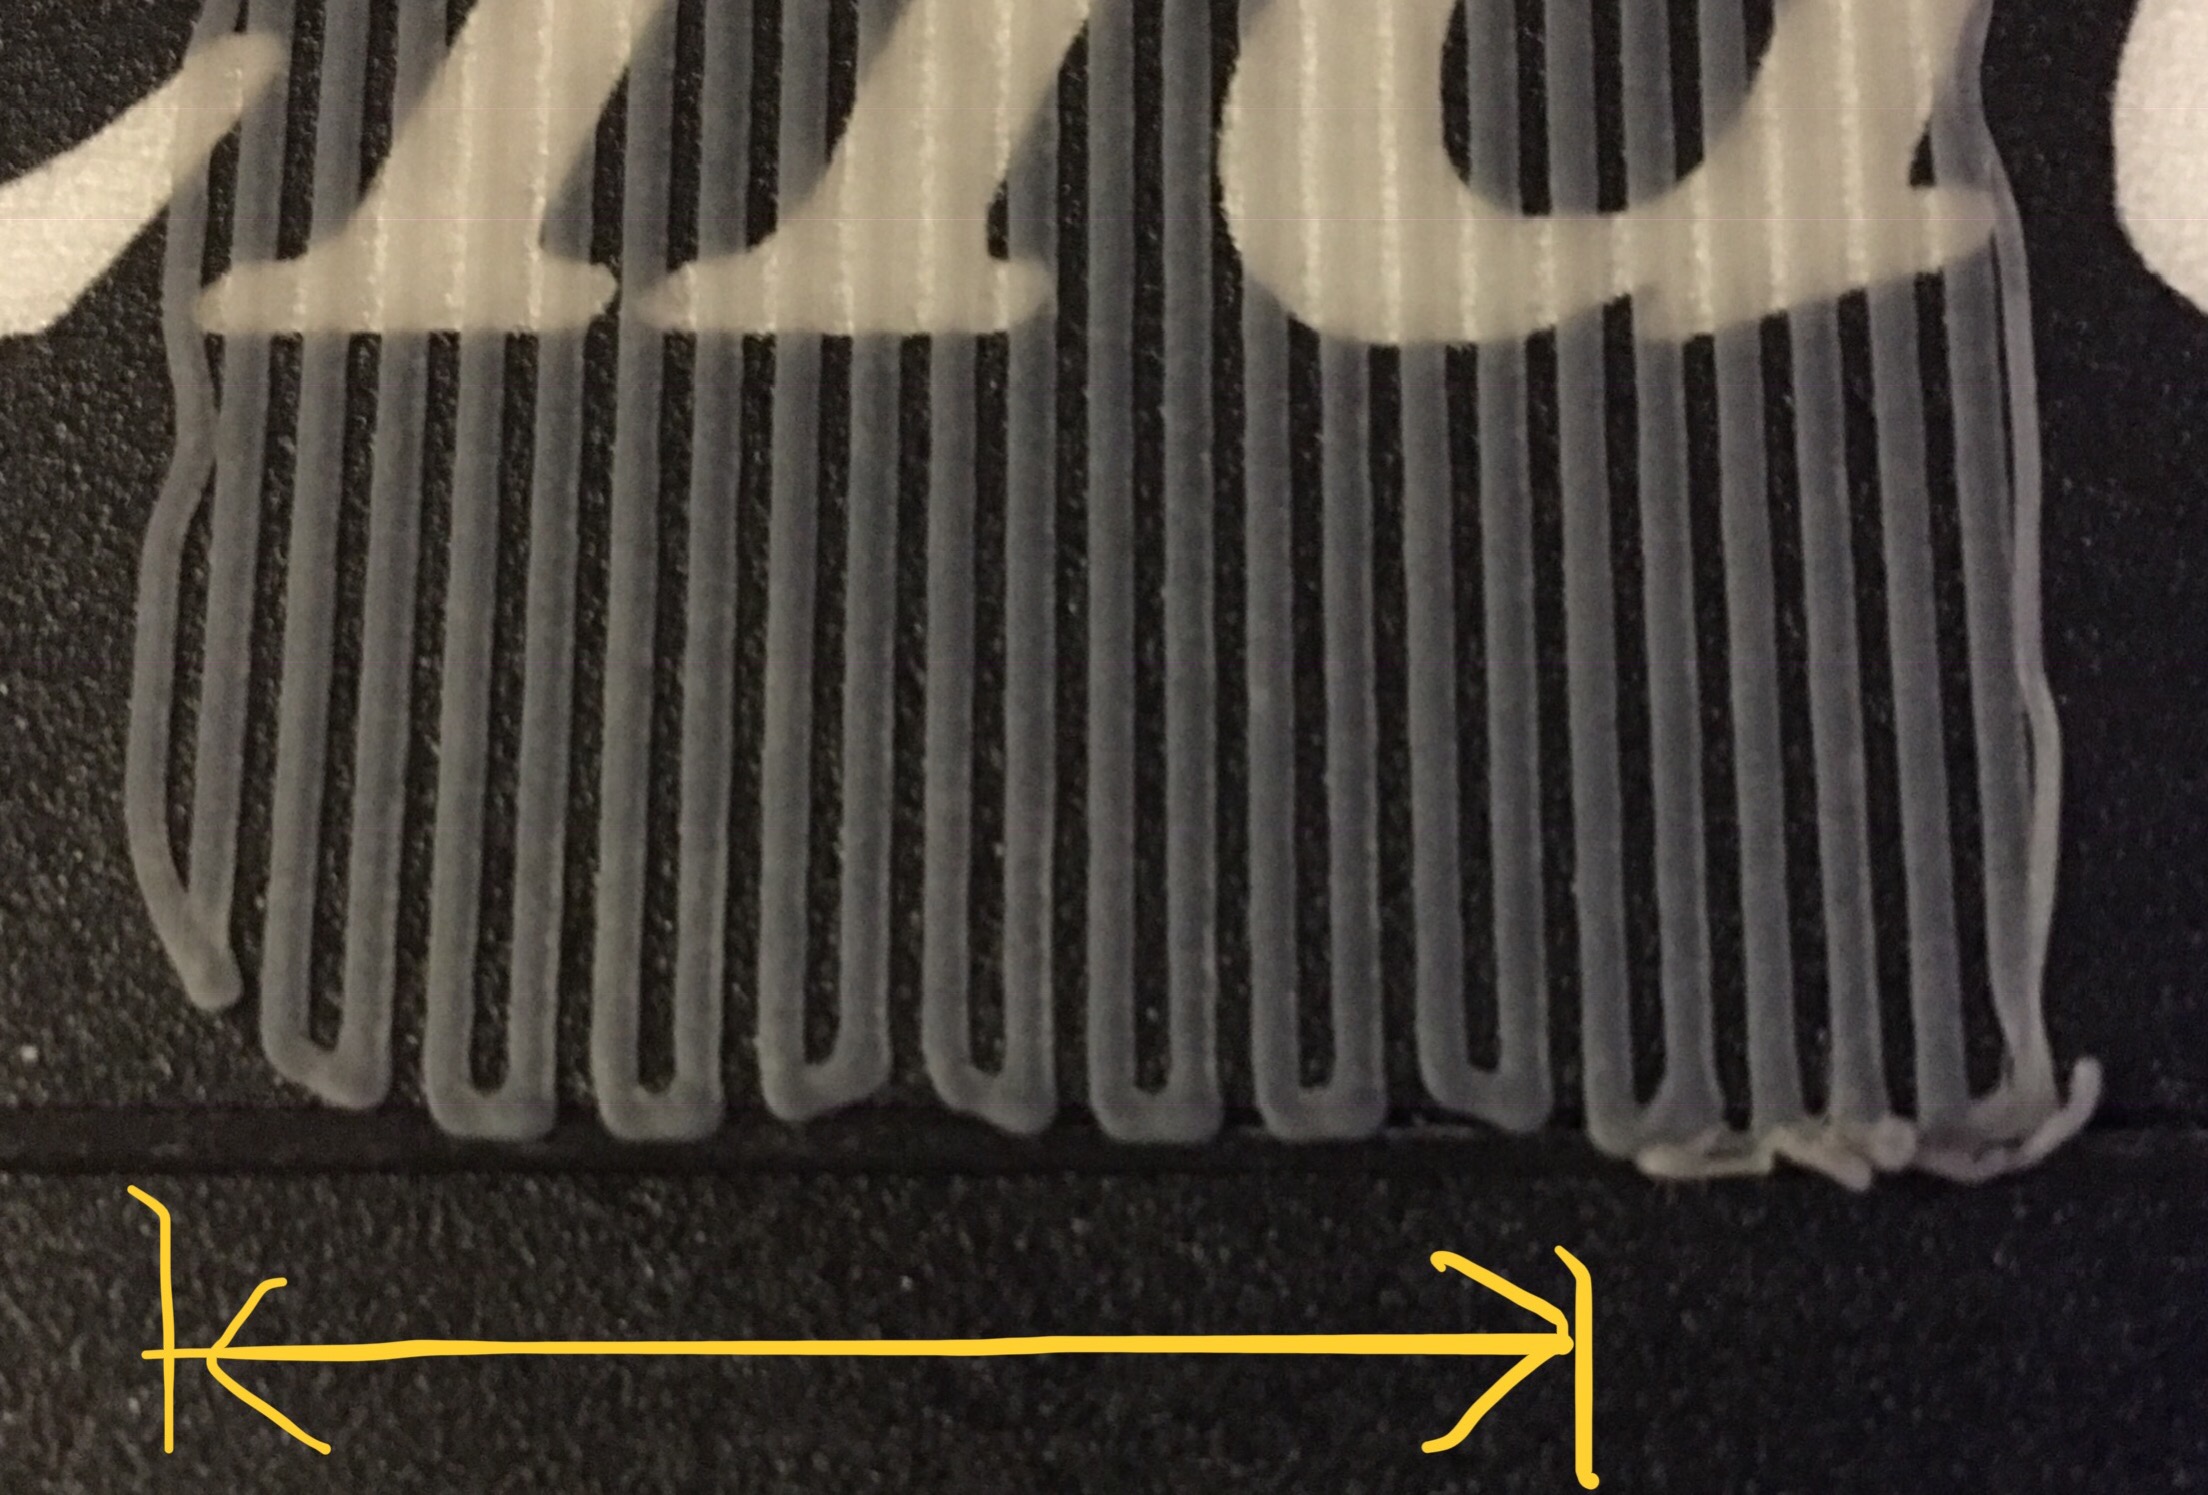
example of problem

$\endgroup$

3 Answers 3

5
$\begingroup$

In Ultimaker Cura you can select only one of the the build plate adhesion options skirt, brim or raft. You cannot select multiple options.

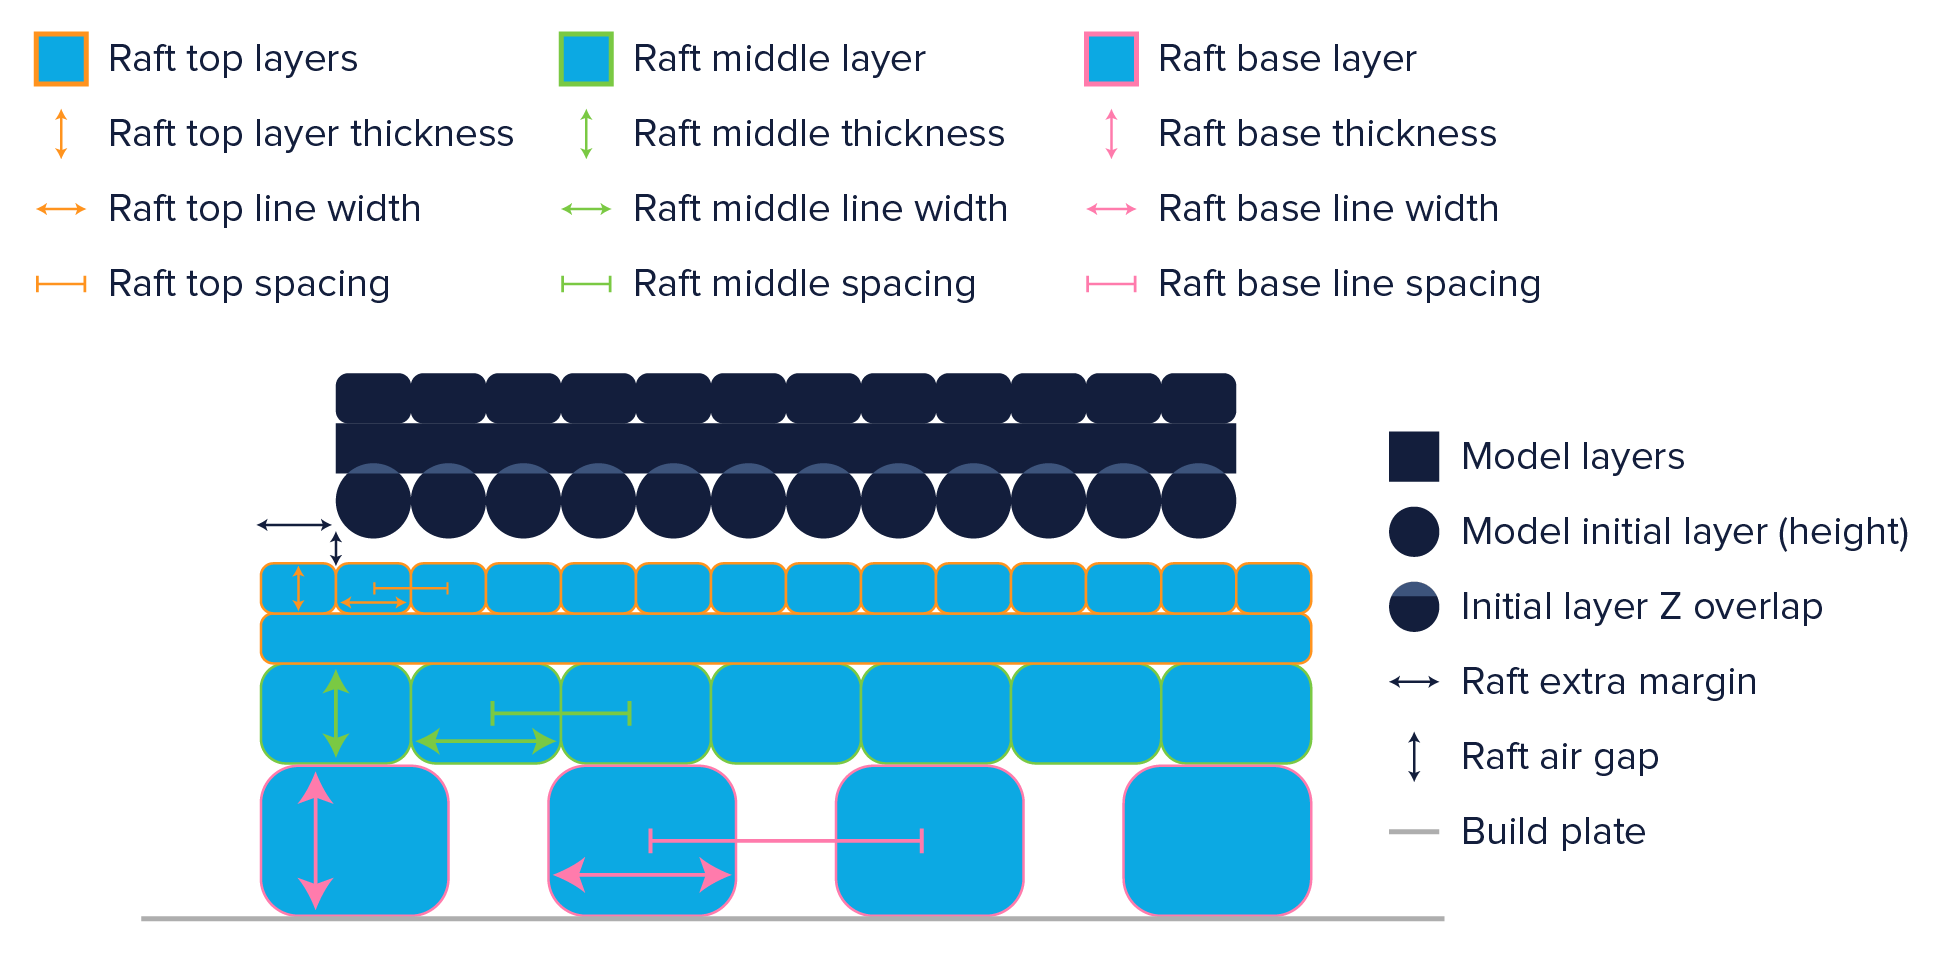
There is no option available in Ultimaker Cura to increase the outline count of the raft bed adhesion structure. Basically the raft exists of a line support structure as can be seen in the figure below. Ultimaker raft support structure layout The line around the lines should be considered "the skirt", so if the nozzle is not properly primed (not sufficient molten filament available), you need to properly prime the nozzle prior to printing.

To prime the nozzle, you need to add some extrusion of filament in your start G-code.

Personally, I like the style of Ultimaker where prior to printing, a puddle of filament is deposited priming the nozzle adequately. Basically you need to move to a position where you like to deposit filament:

 G1 X10 Y10 Z2

Then you need to extrude material

 G1 F125
 G1 E10
 G1 Z3 E5

After that you can even wipe the nozzle.

Another option (that requires some copy/pasting from your side and would not be a recommended practice) that is possible is slicing the model with a skirt (with a sufficient distance to stay away from the raft position) instead of a raft and look at the generated G-code and copy the skirt deposition codes into the raft G-code file. You do need to take care of the proper length of the extruder when the skirt followed by the raft, so you need to use G92 Exx.xx where xx.xx is the actual length of the filament start for the raft.

$\endgroup$
2
  • $\begingroup$ Hi Oscar, dropping an ABS puddle in mid air results in a balling effect rather than it dropping away. I will investigate the follow-up wipe next. I don’t know g-code we’ll enough yet, but can you extrude from a given point continuously as a line on the bed ending where the print begins, or is extrusion always absolute segments at a given rate? I need a running start. $\endgroup$ Commented Nov 10, 2018 at 21:44
  • $\begingroup$ @GoneCoding Start extruding lower then, play with the height, you could even extrude and raise the nozzle at the same time. Ultimaker does use this priming method on the Ultimaker 3, works like a charm, even with ABS. It even works for POM, which is way harder to print and prime than ABS. $\endgroup$
    – 0scar
    Commented Nov 11, 2018 at 0:25
2
$\begingroup$

It's not necessarily the case that the apparent underextrusion of a small portion of your raft is the root cause. ABS is notorious for shrinkage and peeling. As a start, you should have a full enclosure so as to maintain a warm environment while printing.

It's also quite possible that your bed is slightly off-level or a few microns low for the first layer, either of which can cause adhesion problems.

Yes, it's pretty much trivial to add a few lines of gcode to extrude prior to the "official" raft -- or you could just toss a fake small object into your slicer to extend the raft over both the real and the fake parts.

FWIW, with a little care I've found a wide brim outperforms a raft for almost anything I print

$\endgroup$
1
  • $\begingroup$ I get the same gap in the perimeter with PLA. Thanks for advice on brim. I am printing very small parts, so was having issues with skirts and brims. $\endgroup$ Commented Nov 9, 2018 at 9:23
2
$\begingroup$

The latest update to Cura (3.6.0 at time of writing) added a printer configuration specifically for the Ender 3.

The Start G-code script now includes the following:

; Ender 3 Custom Start G-code
G28 ; Home all axes
G92 E0 ; Reset Extruder
G1 Z2.0 F3000 ; Move Z Axis up little to prevent scratching of Heat Bed
G1 X0.1 Y20 Z0.3 F5000.0 ; Move to start position
G1 X0.1 Y200.0 Z0.3 F1500.0 E15 ; Draw the first line
G1 X0.4 Y200.0 Z0.3 F5000.0 ; Move to side a little
G1 X0.4 Y20 Z0.3 F1500.0 E30 ; Draw the second line
G92 E0 ; Reset Extruder
G1 Z2.0 F3000 ; Move Z Axis up little to prevent scratching of Heat Bed
; End of custom start GCode

This prints 2 initial lines, right along the left edge of the print bed. This solves the priming issue completely and results in a perfect initial border on the rafts.

This would indicate this priming issue is a known problem with the Ender 3.

$\endgroup$
1
  • $\begingroup$ Oh, yes, there was such a nasty bug in Cura 3.0.2 when Ender 3 was configured as Creality CR-10 according to the manual, the generated Merlin G-Code did not contain the extruder reset G92 E0 command after the first line was printed. Definitely the time to upgrade to 3.6 after two weeks of trouble and pushing in the extruder by hand :-) thanks. $\endgroup$
    – Palo
    Commented Feb 26, 2019 at 23:40

You must log in to answer this question.

Not the answer you're looking for? Browse other questions tagged .